Thursday, February 14, 2013

Wrapping up the course

Greetings from another snowy day in Pennsylvania!

Congrats to our latest Practical Woodworking course graduates! Last weekend, eleven eager and talented students completed the course as well as their own hall tables. A quick recap of our last days:

After finishing up the legs the previous weekend, students returned to class to work on the skirt boards, table tops, and the mortise & tenon joints that would hold it all together. I love this part of the course because it's the chance for students to add their own creative flair to their tables!To the left, you can see that Dave took advantage of the creative options to add detail to his skirt boards. Using a router and a jig, he was able to cut out the squares you can see there. This detail is one of many that students were able to add to their skirt boards.

Jeff gives a short lesson on how to read a ruler properly and easily (that I took full advantage of during my first few days here). Catherine shows off her awesome measuring skills. She is finding the center of her skirt boards so she could mark and cut a nice curve into them.You can also notice her perfectly square legs complete with mortises! It's really incredible to see these students work so hard for 6 days and how much is accomplished during each one. It wasn't three or four days prior that they were handed three rough boards and look at the progress!

After skirt boards and legs were [mostly] complete, students were set free to router detail onto the edge of their table tops! Rob hosts a lesson often referred to as "Router University" and let's students see what the plunge routers can do.With an assortment of router bits to choose from, students are, again, given the chance to add whatever detail they choose.

It's rewarding for students to have the chance to make their tables into something that they are proud of; something that represents their personality and style. Beyond that, as a soon-to-be instructor, I was so excited to walk around the room and see these tables begin to develop into eleven unique pieces.

At this point in the course, the pieces are starting to look like complete tables and I find that student's confidence is climbing as they see the fruits of their labor.

And then, finally, assembly. Smiles all around for students as they fit each tenon into it's mortise and fit the puzzle pieces together into a real piece of furniture! Allen stands proudly next to his assembled table, as he should after 4 or 5 days of hard work and learning!

We all walk around and admire the efforts and originality that fills the room. By the last day, the class has morphed into a group of friends that has accomplished something to be proud of. Swapping life stories and anecdotes as the nerves have calmed and the comfort has settled in. Everyone has something in common at this point, they/we are all woodworkers!

The final stages of the class allow for students to glue up those perfectly fitted tables. If you haven't made a friend yet, glue up is your chance as it is a partner activity. Lucky for me, I was paired with Mindy and Kristen. Between the laughter, table climbing, and only one moment of panic, we got Mindy's table glued together and held with clamps.


The course wrapped up with a lesson on finishing from Rob and a few parting words. I was more than pleased to have the pleasure of meeting all eleven of these wonderful people! And, I am ecstatic to have had my first chance to be an instructor of sorts for them. I hope they send along photos of their finished tables and any other wooden projects so I can share their successes with you.

Until next time, I bid you all the happiest of Valentine's days.

Saturday, February 2, 2013

Tool of the Day

Greetings from another frigid Saturday in the hills of Pennsylvania. Today, my chronicles adopt a new tradition in the form of a "Tool of the Day" updaes. As I slowly learn the ins, outs, and upside downs of the shop, it's only natural that I come across obscure devices. When I learn about one of the many obscure devices (known to the common man as 'tools'), I will write about it. So, let's learn together about scorps!

Whilst scanning the shop for a foreign tool to inquire about, I was faced with quite a few options. You can only imagine how many tools Jeff has amassed over the course of his 40+ years working with wood. I will admit that my ability to name tools has increased tenfold in the past few months but, when I looked at the wall of hand tools I couldn't even begin to guess what this two handled sharp contraption was called and/or what it was used for.

A dangerous version of one of those fancy eye masks on a stick that people wear to formal costume parties? Or, more logically, some sort of scraper? But, why is it shaped like that? What is it used for?

Turns out, this is a scorp. Deemed Rob's favorite tool name in the shop, it is used to carve/shave/scrape out wood for things like seats (like the bench seat pictured here). Upon further research, I have learned that they can be found in various forms, some of which are on a long handle and used for bigger surfaces that need carving, like the insides of canoes. The scorp in the shop is easily hand-held and when put to work, can do a mean job carving out a nice curved surface from a flat piece of wood.

I'll go ahead and chalk this up as another +1 for my woodworking vocab as well as the expansion of internal tool  name database.

Stay tuned tomorrow for another update on the close of our latest Practical Woodworking class as well as additional woodworking vocab, tool descriptions, and anecdotes!

Friday, February 1, 2013

Back at it!

Good afternoon from Lohr's School of Woodworking! I apologize for my absence but, I hope that a lengthy new post about the most recent class at the shop will encourage you to look past my neglect.

First, as a Florida girl, I must begin this post with a photo and accompanying exclamation, "It snowed!" Not much but, there were snowflakes and they made the ground white and that's all I can really ask for. While the shop looked regal (if an inanimate object can own that adjective) from the outside, I was pleased to light the fire stove inside and dive into another Practical Woodworking class, this time from the perspective of an employee/teacher.

Those of you that have read my blog since the start will know that I started my apprenticeship at Lohr's School of Woodworking about two months ago and my 'training' was to take the week-long Practical Woodworking course that is offered here at the shop. Refer to my earlier posts for detailed accounts of the lessons and skills I learned during that week. On Friday last week, we started in on another class. This time, I am writing to you through the eyes of a teacher/instructor/novice woodworker.

As all Practical Woodworking courses begin here at the Lohr woodshop, the class takes a tour of the house/showroom. I have seen the furniture and interior of this house for months now and it still leaves me in awe. All the pieces are just so stunning that they can't be done justice in photographs. As per usual, the live edge dining table is a fan favorite because it is so uniquely beautiful. But, every piece of furniture, as well as the house itself, was build by the man himself and it's work that will never be matched any other. He takes the time to explain how each piece is constructed and why. Whether or not you are a new-comer to the woodworking world or just here to tack on some additional knowledge to a field you already know, his explanations are logical and clear enough that the design and building blocks of these pieces begin to make sense. No worries though, even if the terms he uses sound like a foreign language on the morning of day 1, that will quickly change throughout the course.

Here is some detail of the live edge dining table I wanted to share with readers. As you can see, he used bones to hold together fragmenting pieces of the live edge; you can find these bones in a number of Lohr pieces as he uses them to repair natural splits and checks in a beautifully simple-looking way. He and Rob will tell you that filling those negative spaces with the clear substance you see here was more than a slight pain in the side. But, honestly, what I would do to sit down at a dining room table and admire this detail next to my plate every night.

And then, class was in session. As a certified math teacher, I have observed a few fellow teachers in my day in order to learn new techniques and admire a seasoned teacher's organization and strategies. Jeff spent a fair number of years teaching high school wood shop so as I observe the class I just took last month, I notice a whole new world of teacher techniques and information being used to educate a room full of varying skill levels. I must commend Jeff on his ability to teach a course to 11 students with entirely different woodworking backgrounds by covering every detail between the way trees begin their lives right up until we are faced with the stacks of their parts at the lumber mill. Day 1 is always incredibly tiring just because of the sheer amount of [new] information the students receive but, no where else are you going to get this kind of expertise eagerly passed on to you by a master. A large wooden sign hung high in the shop reads, "All things will be revealed" and, boy, is it the truth.
At the end of the first day, the students got their three boards. Here Kristen poses with her rough cut FAS oak boards. Through the eyes of a teacher/woodworker here, I now smile at this point in the first day because I know how terrifyingly intimidating looking at these rough boards can be. I was there so recently. I didn't even know where to begin. But, have no fear students of the present and future, we are here to ease your worries. We allow students to take their new plethora of wood knowledge to sight the boards, study their grain patterns, and consider their lengths/widths/heights. There are 4 to 5 instructors eager to help you decide which boards are best for each part of your soon-to-be table. I can promise you will sleep soundly the night to follow day 1 knowing that you just expanded your mental hard drive threefold and the following day you get to use some power tools to go to town on the boards you now call your own.

Day 2 means learning to use table saws, jointers, planers, and radial arm saws. We know that using power tools is exciting, terrifying, comfortable, confusing, and second nature depending on the student. I'd say that on day 1 of the course, I was experiencing the first, second, and fourth emotions in a big way. Because woodworking is still a new world for me, I was always ready to ease the nerves of the newcomers while Rob, Jeff, and Suzanne were ready to do the same while also giving the go-ahead to the more experienced students.

Here, Mike and Catherine are conquering the table saw and the jointer respectively. The shop is full of tools so students can work simultaneously on different tasks. Each day, they are taught several lessons/demonstrations that they will be responsible for completing before the end of the day. Students share the massive shop to tackle each task of the day one at a time a their own pace.

The beauty of this course is that, for the most part, it can be done at the individuals chosen pace. Certain tasks need to be completed by the close of each day but, it is designed so that each student can take each task at their own speed with the close assistance of one of us if desired. As I mentioned, there is a lesson/demonstration to preface each task and a teacher ready to walk you through it when it comes time for you to jump into the hands-on. You will almost always walk into a room of busy workers on any day of class. Because of that, as a student, you are always surrounded by peers and teachers ready to figure things out with you. Students definitely get their monies worth of hands-on experience. Here is Mindy, a fellow woodworking newcomer, ripping her legs from her rough board. The hand placement and the need to keep her eye on the fence were demonstrated in the lesson beforehand and now she is nailing it on her own!

Amongst the power tool-ing in day 2, students are also given their chance to get their hands sticky with glue. Here Rob is giving the formal lesson on how to glue up table legs. Joie the shop dog doesn't seem too interested in the glue lesson but, everyone else gets to see a pro tackle a task they will be left to tackle themselves shorty. We have a glue table that is fully equipped for clamping and gluing of any sort. Although I have heard these lessons before and performed these tasks on my own several times over in the past couple months, I find myself listening intently regardless. It's so hard not to pay close attention to these masters of the craft. Because they are so comfortable and knowledgeable, my brain is telling me to absorb everything I can so that I can make it seem so easy and effortless when I am left to teach it in the coming classes.
After the glue on the legs have dried, students are quickly on to jointing and planing the legs down to be perfectly square. This task is not the easiest of those you will learn here during the course but, it is one that is of great importance. This is one lesson I can probably never see too many times. Throughout the course students learn the importance of labeling and marking the pieces as you move along in order to keep track of measurements, orientation, placement, etc. Labeling with chalk is a necessity when it comes to squaring anything on the jointer/planer/table saw. And, as you can see here, Ron and Brian exhibit how crucial teamwork can be in the course. I can assure you that you will walk away from the shop at the end of the week with a few new friends and an incredible amount of new information along with a hall table and probably the need for a nap.

Day 3 begins student's new appreciation for jigs. I have dubbed this shop as a place of jig geniuses because their incredible logic and problem-solving give birth to jigs that I can't even begin to fathom yet. Here Rob is demonstrating for the class how to use the sled jig for the plunge router used to level out one side of a large piece of wood, in this case the table top. Some pieces of wood will be too big to fit through the planer without ripping it into pieces and gluing it back together. Naturally, Rob and Jeff have created a solution in the form of this jig.
The end of day 3 brings us to the mortise jig. What a feat of problem-solving engineering this creation is. And, this was my first go at teaching woodworking. Jeff gives students the breakdown of how the jig works and anything/everything about the mortises. With the help of the plunge router, some pre-drawn squiggles, a wedge, and the fancy jig, I was left to walk students through cutting mortises into their table legs. 44 legs, 88 mortises, and 11 students later, I am ready and eager to teach as many lessons as they will trust me with!

I shall cease my wordiness and bid you all a fine evening. Expect regular entries in the future. After this course ends, I will fill the working weeks with small bits of woodworking tips, my slowly strengthening vocab, photos, student profiles, and soon enough, the steps towards my own original creations! Happy Friday!

Thursday, December 27, 2012

Cemetery Maple vs. Saw Mill

Returning from a warm, humid Christmas in Florida, I have found that the chilly 30s and rain/snow here at home seem so much more like -15s and sleet. Regardless, I am here, with layers on, ready to head into another day at the shop. Today's update will be about what we tackled last week on Wednesday and, what I will call, 'the day the cemetery maple met the saw mill'.

The saw mill we have here at the shop is a lot like a giant horizontal band saw. It is a big circular blade that rotates at a quick speed, and paired with lubrication via windshield washer fluid, can cut through massive pieces of wood. The blade runs between two big wheels inside the blue boxes you see in the photo and the whole mechanism rolls on wheels down the tracks. The piece to be cut is stabilized with metal spikes (and wedges when necessary) attached to the base of the saw mill. From there, the saw blade height can be adjusted (to make the depth of the cut whatever you so desire) and is pushed down the tracks to create a flat, level cut. This cut is a working face now to provide a flat, level surface from which to cut the remaining sides. We started with an oak log and cut flat faces on each side to assess which way the boards should be cut. Taking into account the hardwood/softwood, tightness of the grain, and any flaws, we decided which side of the log to cut our boards. As the boards were cut, they were stacked on sawing horses to remain flat while they started to dry. We made sure to take a dust brush to them to make sure no excess sawdust would gather and create an environment for mold to grow during the drying.

Once the oak log was cut into boards, we were faced with the mission of the maple logs we had cut and collected at the cemetery the week prior. These logs are not light and/or easily moved around. I learned to appreciate cant hooks, which are long handled tools (like a rake or shovel) with a hook at the end and used in a lever-type fashion to allow people to move such massive pieces of wood. With the help of cant hooks and gentlemen stronger than what my 113 lbs can supply, we managed to cut two of these massive logs over the course of then day.

I even got to try my hand at pushing the saw. It was surprisingly easy to push through such a hard material. But, naturally, during my first attempt, I hit a knot that had filled with dirt and stones from moving it around on the driveway. Thin, fast-moving blades don't agree with stones so we had to change the blade and cut out the knot with a chainsaw before I was able to make a complete cut. You can see the saw horses set up under the overhang for the boards to dry in this photo. They'll stay there until we move them over to the drying racks behind the barn.

The maple ended up having some beautiful curl to it. Here, I am standing with a book match cut from one of the maple logs. A book match is just as it sounds, mirror copies of grain patterns that result from opening a cut like a book. As you can see, the colors, patterns, and curl are so beautiful we were happy that Jeff happened to drive by the cemetery that day. Now, the boards will dry for about two years (because most were cut around 2" of thickness). Maybe, just maybe, I will get a chance to be a part of the creation that comes from these boards in a couple of years.

And, on a final (and somewhat irrelevant) note, I learned to drive a tractor! The most challenging motor vehicle I have had to drive in the past was my father's Mazda 5-speed pick-up so this was a whole new world. They refer to the John Deer as the Cadillac of tractors on the property and I understand why now. It's so easy to learn and use. From the first few cuts of the logs, we got throw away pieces that couldn't be used for anything so they were dubbed firewood. Now, they came from heavy logs and just because they were sliced a bit thinner didn't mean they were light, especially when we were dealing with 10+ of them. Thus, my tractor skills came into play. I was responsible for moving the firewood to the pile after it was chopped up via chainsaw. The tractor is far more fun to drive than my Buick.

At the end of the day, my hands were somewhat numb and I was coated in an awesome sawdust and windshield washer fluid mixture but, I could look at the drying stack of boards and be proud of how much wood we had done. And, I had learned to drive a tractor! I enjoyed my first day down at the saw mill and I enhanced my woodworking vocabulary a bit more.

Now, on to today's tasks. I hope you all had the happiest of holidays!

Wednesday, December 19, 2012

Revolutionary War Maple Part II

This post will be image heavy filled with photos from our day(s) of logging at the cemetery! Because it was such a new and interesting experience, I want to be sure to share with you all the documentation I can get my hands on!

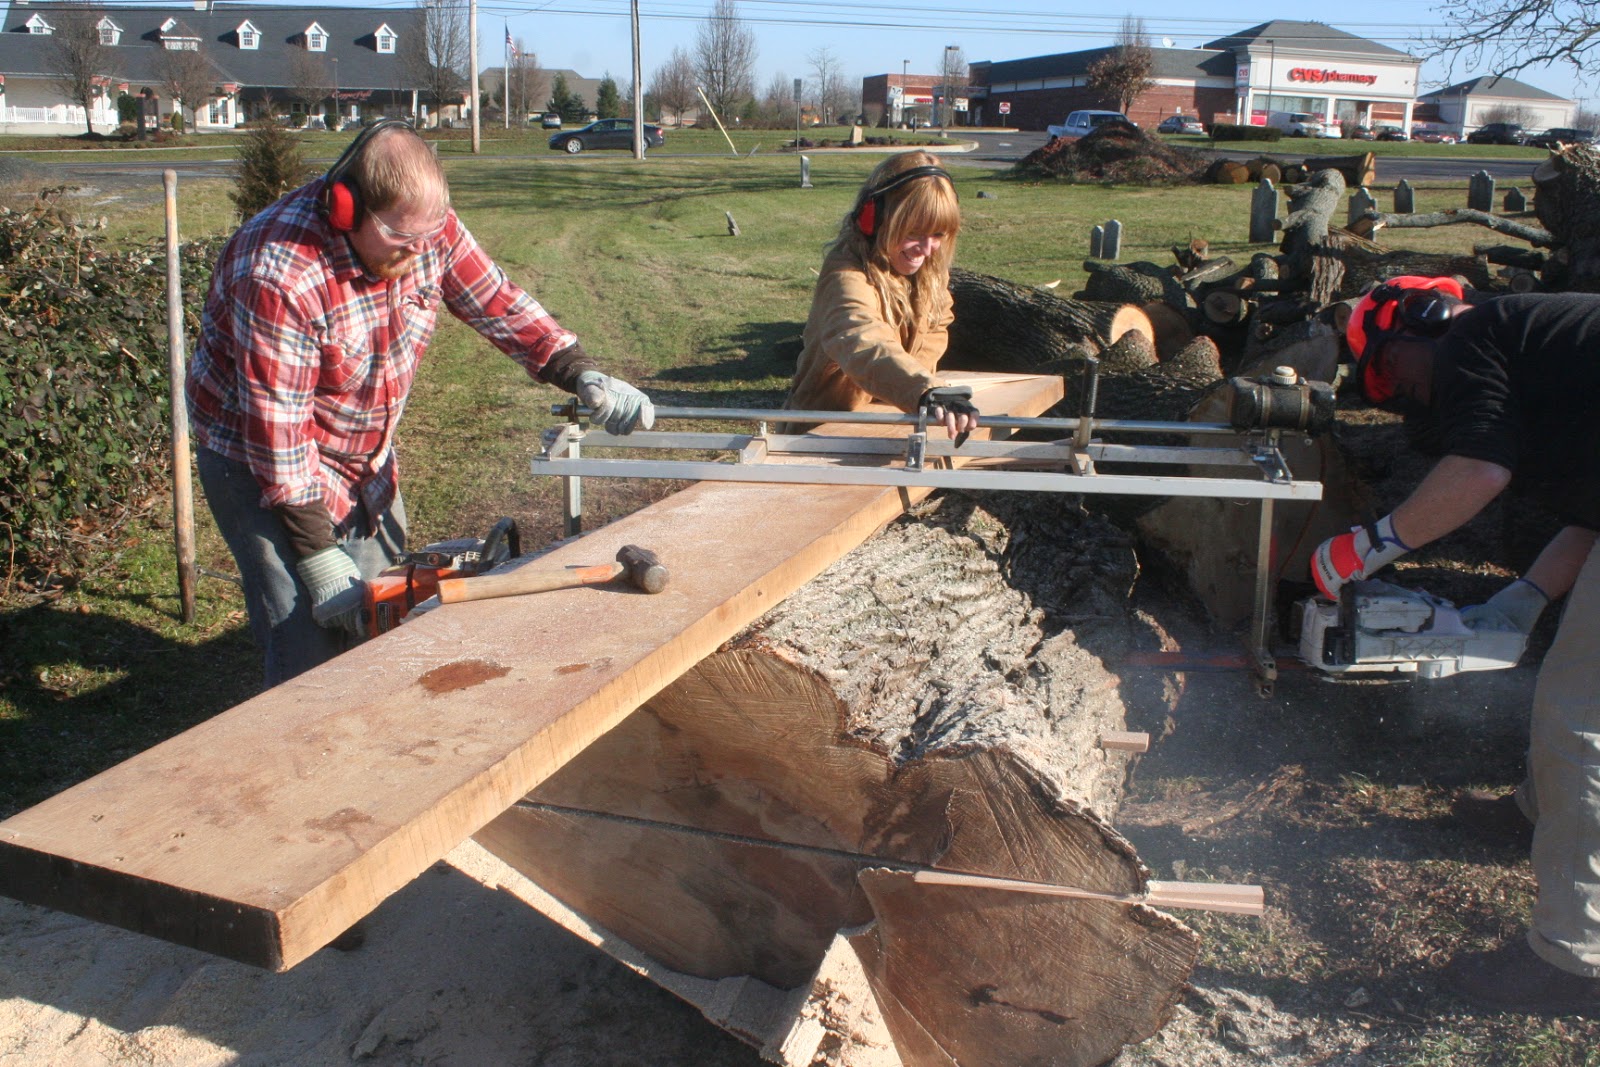
To the left, you can see Rob, Eoin, and me making the first cut into the maple log. We had to use a straight board on top of the log, supported with wedges, in order to make sure the Alaskan chainsaw mill had something level to rest on as we guided it through the log. We were cutting off the top portion of the log so we could try to get the biggest slabs possible from the middle. The top and bottom thirds would later be cut into quarters to come back with us, as well!
Jeff and I high-five in celebration of my first success with the Alaskan chainsaw mill. What a powerful machine! If my arms weren't already aching from unloading, sorting, and stacking the lumber load earlier last week, using this chainsaw did the trick. Although the machine is designed to make your life as easy as possible with the stabilizing bar and two motors to drive the blade, it was still a task to push/pull it through such a massive and heavy log. As I mentioned before, and you can see in the photo, we used a mallet to drive wedges every 8" or so into the cut so that the pressure of the freshly cut wood wouldn't weigh on the blade and damage it or prevent it from rotating.
Also, as I mentioned in the previous post, this tree is a part of our nations history by growing from a ground shared with Revolutionary War soldiers. We were all proud to work amongst the memories of the fallen soldiers. Although we kept our distance out of respect (and to avoid caving in any old pine coffins that are likely to be lacking much strength after almost 300 years), we snagged a photograph with one of the many flags and pendants that mark the headstones of said soldiers.

If I haven't discussed it before, this tree wasn't taken down for our use; it fell on its own from age and rot. And, I am happy to know it can extend it's role in history comfortably in someone's home represented proudly as a unique, beautiful piece of furniture.


The men went back for a second day of logging. Unfortunately, I had to fulfill my role as a teacher on Friday so I had to miss a second day of fun but, they were sure to document their adventures so I am pleased to share those photos with you. I notice a lack of Alaskan chainsaw mill on this second day so I am pretty pleased to know I chose the right day to go logging! Anyway, onwards to the photos of lumberjack men cutting some more cemetery maple to pieces:

Just think, just a few short years from now this beautiful curly maple will be dried and ready to use. The next time you notice a wooden creation in your presence, take a moment to think about how much work had to have happened before this object made it to you. This day of logging really gave me some insight into how much there is to appreciate about wooden pieces, especially those built with real care, thought, and effort. Until next time, ladies and gentlemen, I bid you a lovely Wednesday!

Monday, December 17, 2012

The Revolutionary War Maple

A bit later than promised but, alas, I am here to tell you about our logging adventures on Thursday!

Earlier in the week, Jeff spotted a fallen maple in a cemetery not far from the shop. After chatting with the groundskeeper, we got the go-ahead to slice up some of the trunk for what we hoped would be curly maple slabs. Jeff and Rob and taken a small part of the tree earlier in the week and cut into it to see if it was worthwhile. Even the small portion they cut from showed beautiful patterns in the softwood. So, first thing Thursday morning, we packed up supplies and Trixie the tractor for the trek to the cemetery and spent the day dissecting the truck of a 130+ year old maple tree.

Here, you can see the portion of the truck we cut the slabs from. The picture gives perspective on just how big and thick it's trunk was. The way that the tree had been cut after it had fallen made much of it too short to be used for much furniture purposes so we worked mostly with this big truck log to get useable pieces.

We made the log stable on the ground with wedges and broke out the Alaskan chainsaw mill. This impressive machine is essentially two chainsaw motors attached to one another with an extremely long bar and chain. There is a adjustable stabilizer that attaches above the blade so that it maintains a straight cut throughout. Because of the immense size of this log, we had no choice but to break out the big guns... and it was awesome! After cutting off the top portion of the log, we had a straight, flat base to drag the chainsaw along for cutting useable 2" slabs.

I was lucky enough to get a go at such a crazy machine. I have seen a chainsaw used in my day; I do, after all, have a father that loves maintaining his yard as much as the next guy. But, this chainsaw is a whole different story. Because of it's length and the size of the log, we had to use wedges every 8" or so to keep the already-cut portion elevated enough to alleviate the pressure the heavy wood was putting on the blade. Beyond that, even though we were using newly sharpened blades, it took at least an hour to cut each slab! I am appreciating anything made of real wood more and more each day!

As we spend the morning breaking this massive log into manageable pieces, we are surrounded by the gravestones of Revolutionary war soldiers. Over our sandwiches at lunchtime, the groundskeeper came over and was kind enough to share some of the history of the land this tree grew from. He told us that the oldest headstone they have found in the cemetery so far was from the 1700s. Several of the stones were marked with American flags waving and a pendant proudly displaying a soldier and the words "Revolutionary War". This tree had been growing amongst the original American heroes.

I am still adjusting to living in a place with so much history. I am proud and excited to know that the slabs and boards taken from this aged, historic tree are going to be used to make long-lasting, beautiful furniture pieces instead of pieces of firewood to be burned and forgotten.

After lunch and cutting the two big slabs we could from the log, we used a smaller chainsaw, some iron wedges, and a sledge hammer to break the remaining large pieces of log into quarters. I imagine that every bit of useable wood there is from this log will be so, we needed to get it all back to the shop; cue Trixie. She did her job to carry these huge, heavy logs up to the trailer to be brought back with us. Between the hours of cutting, hammering, chainsawing, and lifting, 3 o'clock was welcomed by all of us. And, now those slabs will be ready to use in about 2.5 years when they dry properly.

Upon our arrival back at the shop, the guys took a small board from the haul that day and planed it to see what curliness there was to be seen. I can tell you one thing, this photograph doesn't do it justice. As the wood shifts in the light, the curls shine and move. It's incredible that nature produces these things and keeps them hidden deep in the layers of it's trees' trunks. We were all so pleased with the results of our labors. I was overwhelmed with, yet again, another day full of new and exciting knowledge. This job is a bottomless pit of new experiences! I'm glad to have survived my first day of logging!

We have some more photographs of our day with the Revolutionary War Tree that I will be posting on Wednesday so keep you're eye out for those! Until Wednesday, I bid you all a good night.

Thursday, December 13, 2012

Back to Apprentice-ing

I didn't get a chance to sit down to write about our day at the shop on Tuesday so today will be a day of two posts! How exciting, I know.

I should make sure to mention that the shop isn't usually open on Mondays so Tuesday is our Monday. After having class for six days last week, it was time to return to "normal" daily life around here. In the morning, we dug out some old pieces of equipment and reorganized a bit. Soon enough, though, our lumber shipment came in. I have never ordered nor received a lumber shipment before so this was, yet again, a first time event for me. A big truck with a back filled with wooden boards, backed up to the big door at the rear of the shop and a friendly driver handed us our load two boards at time.

I don't know the exact order but, I would guess that there were about 100 red oak boards and 10-20 walnut boards. Between the three of us, it didn't take too long to bring them all into the shop but, I will tell you that they were not light for a 5'4", 117lb young lady to carry around. I held my own though! I have sore arms today to prove it.

Here are some photos of the walnut boards. I took this picture because I learned a very important lesson about the drying of wood on Tuesday. Wood boards should be left to dry flat outside in the natural air for roughly a year for every inch of thickness. Then, it can be brought into a kiln to drop the moisture down a final few percentage points so the boards are useable knowing that they won't warp or expand/contract too much. Naturally, people don't want to wait years for their wood to dry, they want it immediately so that they can build what they please. Because of this demand, lumber companies have developed kilns that dry the wood at a far quicker pace but, the sacrifice is lost in the color and the ticks and breaks in the end grains. These walnut boards were dried in a speedy kiln and are much darker and grayer than the walnut that was dried naturally here on the property.
Back to the lumber delivery. As we took our two boards, we had to look at their width, straightness, and grain patterns in order to sort them. There red oak boards are destined to be made into tables by our next Practical Woodworking course in January. We had three tables; one for boards that would serve best as legs, one for boards that would make good table tops, and one for boards that would serve as skirt boards. Once all the boards were off the truck, Rob and I were responsible for the next step(s). We were to start with ten table top boards laid out on the biggest work bench. From there, we were to find a leg board that matched in color tone for each table top board and stack it on top of it's new mate. Next, the skirt boards, following the same general rule. Soon we had ten stacks of three boards each. Sigh of relief, I was finally done lifting and moving these heavy boards. NOT. We made twenty more piles of three so that we had the wood prepped and sorted for the next three classes. At this point, my arms were telling my brain that they quit but, my brain was telling them to drink a Diet Coke, wake up, and keep going. And, so I did. Rob and I continued as a team as we stacked these 90 boards on shelves eight-ish feet high on the wall to wait until our next class of students comes along to cut them up into table pieces. I hope at least one of you readers takes the Practical Woodworking course so that you can know how much thought, effort, and pain went into organizing the boards that will eventually become your tables.

Finally, the day was winding down. I felt it was only fitting to capture of picture of Jeff paying the bill for our lumber. I know it hurts to write a check so big but, I also know how happy a room full of students will be to receive those boards in a few weeks from now.

So, I survived my first lumber delivery. My arms have been reminding me of that for two days as they have been consistently aching. And, I can't reach the top shelf in my kitchen because the muscles decided they don't want to extend so far. I have high hopes that they will change their mind in a couple of days. Until then, I thought I would try to stick to small jobs and catching up my blog. I thought wrong. In my next post, you'll read about how we cut slabs from a fallen Revolutionary War, cemetery tree.