Monday, December 10, 2012

Practical Woodworking Day 6

Saturday wrapped up our December Practical Woodworking course. I was sad to see my 10 fellow classmates depart back to their corners of the world but, I was so impressed to look around the room at the end of the afternoon and see the nearly completed, beautiful tables and smiles to match! I can assume that my classmates can agree that the week was not only incredibly informative, but also a unique and overwhelmingly enjoyable experience. I am so excited to know that within the coming months, I will be playing an active role in the teaching of this course! I am also crawling out of my skin in anticipation of using the knowledge I have begun to acquire about this craft to create and help build so many pieces!

As I closed my last entry, I mentioned that, even after an afternoon filled with it, I had to jump back into sanding on Saturday morning. There are so many surfaces to be sanded and so many edges to be broken for this table. Between four legs, four skirt boards, and the table top itself, I thought the sanding would never end. Each surface had to be sanded down with 80-grit paper, followed by 120-grit, then 180, and finally 220. As you can probably tell by the photograph, I am basically a pro with a sanding machine now.
When the sanding was done, our next mission was to glue our bases together! During the lesson on how to properly glue the base of the table together, Rob mentioned that this was the part that some people would find themselves freaking out over because it's one of the final steps. Naturally, I had already known that freaking out was in my near future because I had spent so many hours working so hard on my first wooden creation that I was bound to mess it up during the final stages. Luckily, the environment in the shop makes it easy to ignore my nervous subconscious trying to butt in and focus on how excited we all were. First, we dry clamped the table base together. Table gluing is a partner activity since it has to be done so quickly (10 minutes before the glue starts to dry) and everything has to fit so tightly. Here, Steve and I are working on gluing my table base together. The dry clamp showed that I had no major issues and everything fit flush up against one another so we moved on to the glue. Using small paint brushes, we put glue in the long sides of the mortises and on the sides of the tenons so they would hold together tightly. Keeping in mind that we didn't want glue seeping out of those crevasses, we had to be sure to use the right amount and wipe away any excess glue with toothbrushes. Once the glue was in place, we put all the pieces together and clamped it up. Six clamps were used for each table to make sure that the pressure being distributed on the mortise/tenon joint was even. We then set the tables aside to dry for at least an hour while we moved on to finish sanding out table tops and learn about finishing!
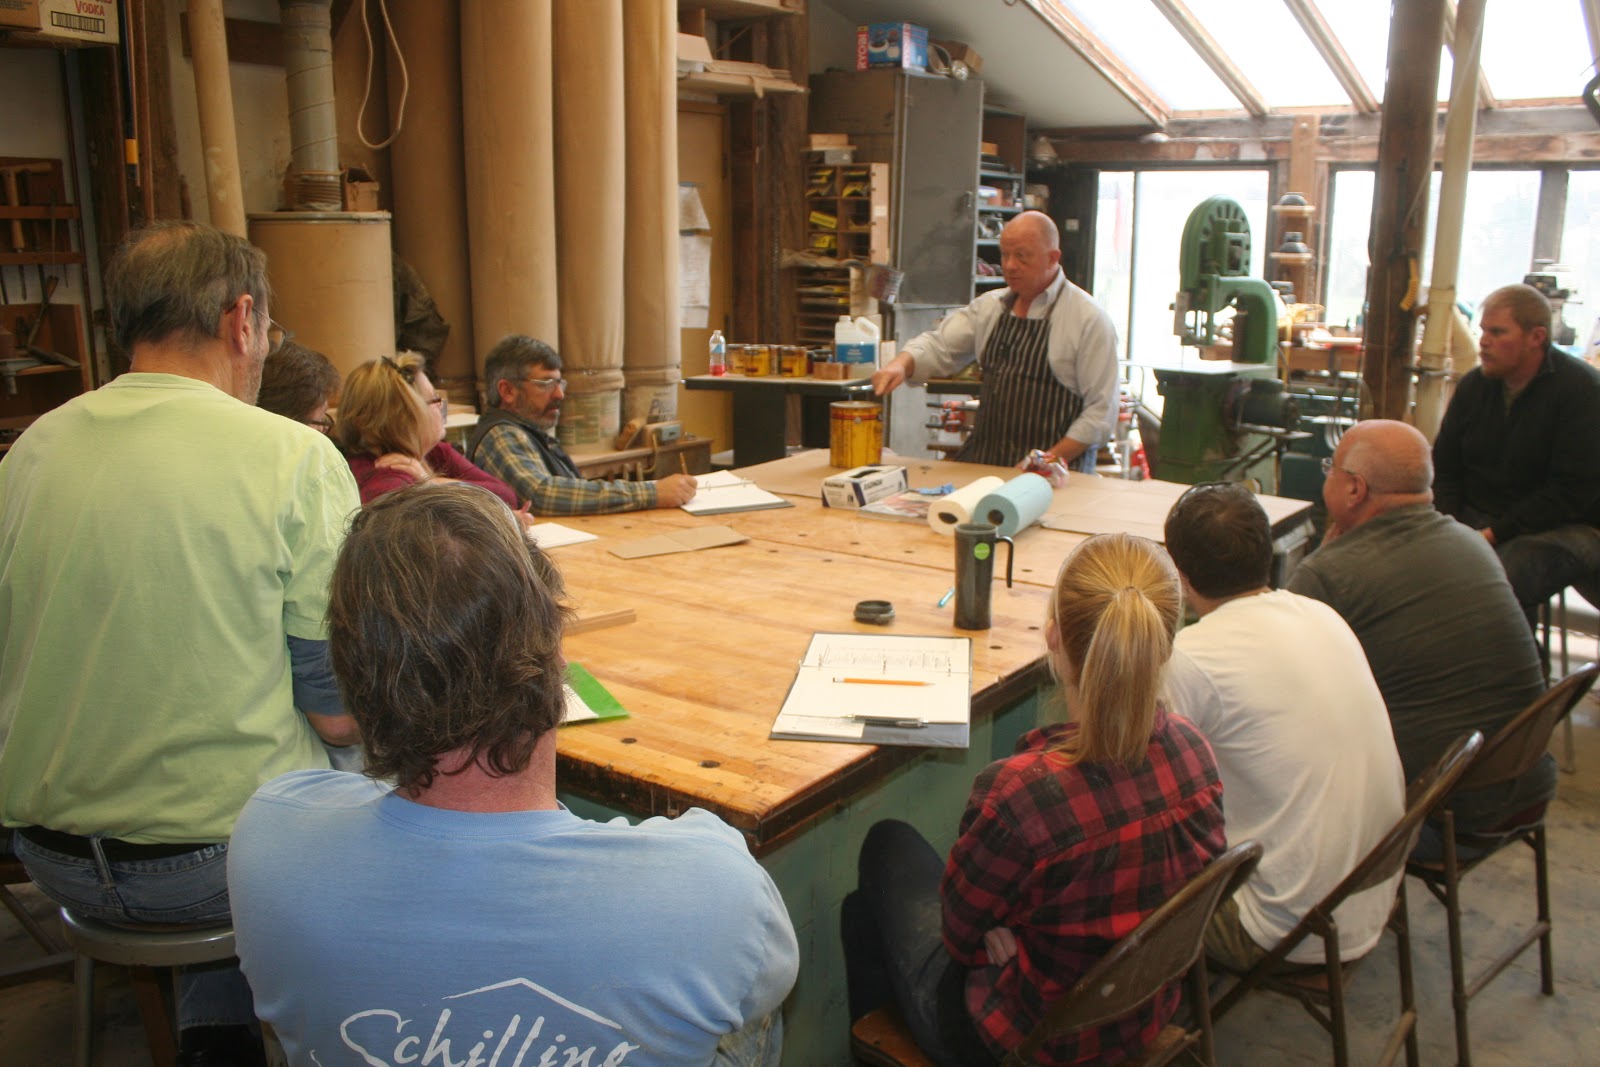
Learning about finishing was our last lesson of the course. We all gathered around a big work bench to get the low-down on stains, oils, and varnishes/polyurethanes from Rob and Eoin. I should note that these lessons include such a vast array of information that I couldn't even begin to repeat in as much detail as the are delivered. Just to give you an idea, during this lesson on finishing, we learned about: the best paper towels to use, how stains can be mixed to achieve the color you want, how boiled linseed oil makes the colors of the wood pop nicely without altering the natural color and tones, the effects of the sun on colors and stains of wood, how paper towels covered in oil or varnish can spontaneously combust as they dry if they are balled up, and about a thousand other useful bits of information. Unfortunately, we don't have the time in the course to stain, oil, or varnish our tables because the drying process takes so long (up to two weeks depending on the finishes you decide to use) but, the teachers at the school give this final lesson so that we knew exactly how to tackle the final stages of your table completion at home.

I have big plans for a coat of boiled linseed oil and a few of varnish to finish up my table. This photo gives you an idea of where my table stands at the moment. For the most part, everyone in the class left with their tables in the same state. I have the assembly done and because the blocks that hold the table top in place are so easy to remove and put back on, I will take it apart to tackle the linseed oil and varnish stages. The table is sanded and ready to take it's coat of boiled linseed oil at the first chance I get. We know it's square because we measured for squareness while it was clamped so we could make any adjustments necessary while the glue was still malleable. I will be sure to post pictures of it's progress through the finishing process. I hope my classmates send us photos of their completed tables at home so I can share some success stories with readers! I can already envision what a perfect home mine will make for my record player in the living room of my small Philly apartment. It will be a slight contrast to the cheap, black, particle board furniture that fills the rest of the room.

I want to take the time to thank the wonderful teachers at the Lohr School of Woodworking for spending six days trying to give all the information you have about the beginning stages of woodworking to us. I also want to thank my classmates for being such great people and providing such a positive and communal learning environment. I hope to see some of them come back for the advanced classes so we can continue building woodworking knowledge from Jeff, Rob, Eoin, and Suzanne. Beginning a new craft is challenging but the outcome is so stunning and fills you with so much pride, I can honestly say I would recommend the course to anyone with any interest in woodworking. Tomorrow, I step out of my student suit and back into my apprentice suit but I look forward to all the Practical Woodworking courses to come with this new year! And, a final congrats to my fellow December 2012 Practical Woodworking graduates (and the chickens, too)!

Saturday, December 8, 2012

Practical Woodworking Day 5

Yesterday was our fifth day of the practical woodworking course. That makes today our last day and how bittersweet it is. After what will be six days of long, hard-working hours I know we will all be happy to return to our respective parts of the country to sleep and reflect on the immense amount of information we were handed this week. But, I'm sure we can all agree that we'll smile when we look at our stunning tables and remember that beyond the exhaustion and splinters, we had a great time learning a craft together from the best is in the business!

Anyway, on to reflect about day five. The day began with coffee and pastries, as per usual. We had four skirt boards and four legs that were begging for some artistic flair. No need to worry, the shop was prepared to deliver. Here, Jeff is showing us a table router that has a bit in it that makes a small bead along the edge of the board you push through it. I ended up using this detail on my skirt boards for a little rounded detail to match the edge of my table top. This process was surprisingly simple as long as you make sure there is no saw dust piled up preventing you from making a straight cut. Naturally, I did not make sure of that but, we'll chalk it up to a learning experience. Another option we were taught for our skirt boards was cutting it to a curve. You can see Steve proudly showing off his curve. To achieve this detail, we were taught to used a nail, a thin piece of wood, and some clamps to trace a perfect curve. Then, head over to the jig saw and cut along the line. Fairly simple until you need to take a block planer to it to make sure it's is smooth and symmetrical. But, it really does end up looking great.


The next detail we learned about dealt with the legs. We were taught about the development of another Jeffry Lohr original jig designed to taper legs so they have two angled sides instead of being square. I am using said jig in the picture to the left. The jig holds the leg firmly in place with wedges at the angle desired. The excess wood hangs over the edge. It even had a handy handle to push the jig and the leg through the table saw. I must say, this jig produces some fine looking table legs.

As I mentioned yesterday, I had to finish up my tenons before I could do much of anything else. Now that I had learned of all the fun details I could add to my table, I was hustling to get the tedious work out of the way. I finally got all eight tenons to fit into their mortise holes. I also learned to properly spell the word 'tenons' in the process. Larissa's woodworking vocab score +1.
The tenons were fitted, the details were added and it was time for me to dry assembly my table to make sure everything fit and looked the way I wanted. Good news, ladies and gentlemen, my table stands! It's hard to see the tapered legs and the beaded detail along the skirt board in the photo but I assure you that they are there. I played it simple this time around knowing that I will have ample opportunity to design and assemble many more tables during the apprenticeship. I want to be able to look at this table twenty years from now as my first woodworking project and not think to myself, "what was I thinking?" Although I probably will anyway, being logical and math-minded, I played it safe. Some of my classmates have the most detailed, creative, and beautiful tables! I will be sure to snag some photos of their creations as well so you can see how we all started with the same basic design but ended with radically different looking final products. Another reason this class is so wonderful!
After lunch Jeff gave us a demonstration on how to fill knots so they look nice and natural. Using bits of crushed bark and/or wood pieces he combined them with other colored powders and epoxy until it formed a paste. Once the paste matched the color he wanted, he taped the space around the knot(s) and filled it with the paste. He made sure the paste filled the entire hole and then some so that it was raised above the wood surface. He told us that when it dries, he can sand it down and it will look like a natural knot.

For the most part, the rest of the afternoon was devoted to sanding. Jeff gave us a brief lesson on sandpaper grit numbers and what they meant. He also talked to us about which sanding machines were best. He is a fan of the random orbit sanders because they don't leave the circular marks on the wood that other sanders do. We took to our table legs, skirts, and tops to sand each of them with 80, 120, 180, and finally 220 grit paper. By the end of the day, my wood was like satin. Granted, my hand was numb from the hours of vibration but, I couldn't believe it! We made sure to avoid rounding the edges of the boards that would be glued so that they would remain flush with the parts they would be glued to. Today, my job (amongst gluing and other things, I am sure) will be to take a sanding block and dowel rod to sand around my details. I need to re-round the beaded detail I put on my skirt boards as well as the edges of my table top. I know I will have a tired arm by the end of the day.

My workbench neighbor, Steve, has gone above and beyond on his table. His love for dark walnut has worked it's way in in the form of buttons at the tops of his legs as well as set into his table top. We all laugh at his desire to "make it fancier" but, I am impressed with his dedication to his table. I heard speak of bones being set into his table top as well. I am really, very interested in what Steve's final product will be. Here he is, hard at work, using a router to drill holes for his buttons!

Although I lack any photos to document it, Jeff spent a good portion of an hour teaching us how to replace blades in jointers and planers. He has spent time throughout the course explaining the inner workings of the machines that fill the shop. He designed this course so that if you have your own shop at home, or have the desire to begin assembling one, you know how to maintain your machines. Each process is unique and, in some cases, extremely complex but he has a method for all of it and he shares it with his students. He tells you which kind of machines he recommends but also explains the pros and cons to other options. Whether you take the course to learn the proper techniques of a craft you already experiment with or a student (like me) who knows nothing about woodworking and wants to learn, this course will give you everything you could ever need or want.

Now, I will return to our final class to (hopefully) finish up my table! I look forward to finding out what finishing touches they have in store for us today. Have a wonderful Saturday!

Friday, December 7, 2012

Practical Woodworking Day 4

By day 4 of class, I have learned so much it seems as if we have been submerged into a world of wood and I finally (sort of) know my way around it. It's nice to have classmates around learning and experiencing the same confusion, anxieties, increasing comforts and immense excitement with me.

When Jeff says, "Today, you need to cross cut your skirt boards to their correct lengths and joint the edges to make sure they are right angles", I know exactly what he is telling me to do. To the right, you can see how the day began for me. Just as Jeff instructed, I used the table saw to cross cut my skirt boards. These boards will fit into my legs using the mortises I cut into them two days ago. It was important to make sure that the pairs of skirt boards matched perfectly in thickness, width, and length so that the table would be a proper rectangle.

In order for them to fit into the mortises, however, we needed to cut tenons into the skirt boards. Celesta is doing just that in the picture to the right. Using the table saw again, we cut the male part of our puzzle pieces (formally and properly known as tenons) out of the edges of our skirt boards. This process was tedious only in the fact that we had to make sure that all the boards were cut the exact same way so they could fit into the exact same-sized mortise holes we drilled the day before.


Eoin demonstrated how the tenon should fit snug into the mortise. Naturally, it isn't always so simple. Some tenons will be too thick, some too thin, and some too long to fit just right into their mortises. We were taught several methods for solving such problems. Using chisels we can shorten the length of the tenon if it is too long or if the cut along the shoulder is raised preventing the skirt board from fitting snug against the leg. We learned to use hand planers to lessen the thickness of the tenons but were advised to be weary of how much wood they take off because a tenon can go from too thick to too thin in a hurry. When we need to take off just a bit of thickness, we were taught to use the cabinet scrapers we had conveniently learned to sharpen the day before. It is a delicate process making a tenon fit properly into it's mortise, I must say. We made sure to fit each tenon to the mortise it will be glued into when we finally glue the table together.


In order to know which tenon paired with which mortise, we needed to decide how we wanted out table skirts to be arranged. Here we are as a class (because the teachers are building a class table as we are building our individual ones to model how things should and/or could go as the process progresses) deciding which faces of our skirt boards we want to show from the front, sides, and back of the table. We talked about how grain is most appealing to the eye; tighter grain toward the bottom. We discussed how any flaws might want to be hidden towards the inside of the table so they aren't obviously visible when it's in our homes. Once we had decided on the arrangement of our faces (which I was doing in the photo), we labeled our tenons accordingly. Each tenon was marked with the leg number it would fit into and an arrow indicating which side was going to be up. Now, we could start fitting our tenons into their matching mortises. As I said, a delicate process. I am still not finished with fitting mine. I will be finishing that up today!


Now it was on to adding some flair to our table tops. We planed and jointed them to perfect rectangles the previous day so they were ready to look like table tops. After a lesson in varying router bits, we were sent on our own to decide what kind of shape we wanted the edge of our tops to have. By the time this picture was captured, I had already done my end grain cuts but, during Rob's lesson we were told to start with the end grain so that when we cut the length, any little fibers that were left from the end grain cut would be removed. We also took a smaller router to the sharp table edge that was left to round it a bit. Because I know we will be sanding the edges sooner or later, I decided on a relatively simple edge so I wouldn't have to work the sandpaper into difficult crevasses. I must say though, some of my classmates were more inventive with their edges and they look so great!
Celesta and Duane were the first to have their tables together! See how great they look! There is still finishing and optional skirt detail to toy with but, the overall product looks so wonderful. Like I said, my tenons still need some work before I can see what mine will look assembled but, Celesta and Duane gave me a little preview and a boost of motivation to get those tenons fitted quickly. We only have today and tomorrow left of class so I am anxious to learn how to finish these masterpieces up. Until tomorrow, readers, I bid you a happy Friday!

Thursday, December 6, 2012

Practical Woodworking Day 3

As a class, we have all survived day three of Practical Woodworking. I look at what used to be three rough boards and am happy to say it's starting to look like real parts of a table!

Yesterday we started the morning with lessons on various techniques for carving out mortises. Mortises are the rectangular holes that we are carving into our table legs to put the tendons of the table skirt into them so they hold together level and strong (a lot like a puzzle piece). We were told that using chisels is one way to dig out the wood once we have measured precisely and drawn out where the mortise will need to be. To the left, you can see Jeff teaching us how to accurately measure and draw out a mortise.

Because using a chisel is useful in more ways than hollowing out mortises, Eoin gave us a lesson in how to sharpen chisels and/or cabinet scrapers. Who knew there were so many ways to do it? But, what is comes down to is needing a fine sandpaper-ish surface. Whether it be in the form of actual sandpaper or a water or oil stone, the fine rough surface is the best and quickest way to sharpen those metal tools.


Here is a perfect example of how many ways they present information for us to understand. The left set of steps illustrates how a chisel should look as it is sharpened. The middle steps illustrate what the edge of a cabinet scraper looks like as you sharpen it. And, the drawing to the right shows us how to view and label out table legs. Each leg needs to be numbered so we can remember which way they face and which position they will take under the table.
When the lessons wrapped up right after lunch, we were put to work. I had to catch up on my table top so after a dry clamp to make sure my two boards matched up, I took to putting it together with biscuits. Suzanne was nice enough to help me with the process as I drilled holes in the center edges of my table top boards. Then I went on to use wood glue to glue the center edge and slid the biscuits into the holes I drilled for them. My table top is currently held together tightly by clamps but it should be ready for it's final joining, planing, and ripping today!


After my table top was glued, I moved on to nearly finish up my legs. I used a paint scraper to remove any glue that had been squeezed from the middle of the two pieces so that the glue wouldn't chip the blade of the jointer when I went to run it through. This process was fun but it was a lot harder than it looks. I think it's been made evident that I need to build some upper body strength for this job!

When the glue removal was complete, I found the flat, face side of each leg by laying it on the table to find which side didn't wobble. I ran that side through the jointer and then rotated the leg once and did it again so I had to perfectly perpendicular sides. From there, it was necessary to make sure the other two sides were parallel to the ones I had just made. To do this, we needed to make sure to mark the jointed sides with x's so that we wouldn't lose them. Now, it was on to the planer.

Teamwork on the planer! We ran two legs at a time through the planer to make the non-x sides parallel to the x sides. Once that was completed, we needed to make them square. By setting the planer to our desired thickness, we ran the legs through making sure to plane each non-x side as a pair so that the same amount was being cut off each time keeping it square and right-angled. The method they use to make sure to keep things straight is writing an odd and even number on each side as they come through so we know which sides have been planed and which haven't.


Now that my legs were square, it was time to put in some mortises. As I mentioned before, Jeff explained at least four different ways to cut out mortises but the easiest, quickest, and most accurate method was using a router. Not only a router though! Jeff, faced with the struggle of carving out these mortises so many times but it taking far too much time and effort, has created a jig. This jig stops the router at the start and end of the exact length of our desired mortise. Beyond that, it holds it straight against the leg face so that the mortise is straight and accurate.

Here I am hard at work using Jeff's jig and the router to cut out my mortises. Each leg has two mortises cut out of it. Like I said, the jig makes it almost effortless. I carved out my eight mortises in a matter of two minutes. Much easier than measuring, marking, and chiseling! I am very much looking forward to learning more about the creation and assembly of jigs.
Nearing the end of class, Jeff and Rob showed us how to joint and plane our table tops. Naturally, because we are dealing with a natural material, there are bound to be flaws and difficulties. Noah, found himself with a could of knots on the top of his table. The problem with this is when he put it through the planer, the grain was torn out around the knots because it wasn't going the same way as the rest of the board. Jeff took this as a learning opportunity and called us all around to tackle the issue. He lightly wet the grain around the knot and ran the board in the direction that the largest grain issue was running. This fixed a large portion of the tear out. Then, he showed us how there was only a small amount of roughness left so that would be taken care of with a sander. Now that the majority of the board was smooth, it was easier to take care of the small area of difficulty.

Another day, another step closer to our tables. Today, we will deal with our table skirts and, if you are me (and behind), you will joint, plane, and rip your table top! Until tomorrow, I bid my readers a great Thursday!

Wednesday, December 5, 2012

Practical Woodworking Day 2

After our first day of learning, watching, and listening, we arrived at day 2, ready to use some machines and tools! As I mentioned yesterday, we were each given our three rough wood boards and asked to plan which board would be used for each part of our table. Now it was time to take that rough wood and start forming it into the parts we had designated. This is when I get nervous. I am a great planner but when I have to execute, my nerves kick in knowing I have the potential to mess it all up. But, alas, I survived day 2 without completely botching anything.
I can credit the teachers here, mostly, for that. They spend time at the start of the day going through the processes you will carry out throughout the day so you can see how it's done correctly. From there, they released us to begin work and creation. There are four teachers are around and ready to walk/talk you through each step along the way so people like me don't second guess myself and ruin something. As you can see, in almost every picture in this post, there is a teacher with us making sure we are comfortable and understanding what is going on and why.


I had a great time with jointers. If you don't know what a jointer is (because I sure didn't before this week), it is a long, narrow table with a rotating blade in the middle that flattens and smooths the surfaces of the wood as you run the pieces over it. The fence along the back is perpendicular to the table so it can create right-angled cuts. The most challenging part of learning to use new machines like this was remembering that the grain means so much. Looking and feeling which way the grain runs and making sure you run the board with the grain will give you a smooth surface. Consequently, running it against the grain will tear it up and leave grooves and texture. This rule is particularly important for the jointers and the planers. Keeping safety in mind at all times, we are all wearing protective glasses and, in this case, I am using handled pads to push the board through the jointer as to avoid anything happening to my hands because, after all, I do need them to teach student's math on my off days.

To the left, Steve and I are learning the ways of the planer from Rob. On the cart, you can see that we both had spent the morning cutting one of our boards into eight legs (which will be glued together eventually to make four). Using the jointer to make a flat working edge, we used the fences on the table saws and jointers to make perfectly flat, squared legs. The planer was our final step to making sure the face sides were parallel. The planer pushes the pieces of wood against the flat, metal table (which worked perfectly since we had jointed a face side to be flat and smooth already) and, using powerful rollers, pulls the wood through where a rotating blade at the top levels and smooths the top face of leg. We marked each end of the legs as they came through the planer so that we could remember which way the grain went in case we had to put it through more than once (which, of course, we did).

Because the surface of our table is wider than the width of one of our boards, we have to combine two. Here, I am using a router and a sled table to smooth one side of one of my boards. Ordinarily, I could just run it through the jointer but, this board was more than 8" in width and the shop doesn't have any jointers exceeding 8" so, I had to tackle another method. Using the sled that the router is on, cooped with the fact that when Rob and Jeff made the table they made it perfectly straight and flat, I ran it back and forth over the board and it cut a straight, smooth face on my board.
The second method for dealing with a board greater than 8" in width would have been to rip it into two pieces, use the jointer like I did for the legs, and then glue those pieces back together. I considered that option except that my board didn't have any really straight grain to rip along so it could have been messy.
Here, Eoin is teaching us about biscuits. Biscuits are used to make sure that two pieces stay level and in the correct position when they are glued together. As I said before, our table tops require us to glue two of our boards together in order to make it a reasonable width so, we will be using biscuits to hold them together. Biscuits look a lot like small, flattened wooden footballs that slide into notches that we cut into the edge of the boards. Because it's tough to describe in words, I will be sure to snag some photos today of what exactly a biscuit looks like. But, paired with some wood glue, they will be sure to keep our table tops level and bonded strongly (which is just what I need to hold my obese cat when the decides to make a home on top of this table).

Eight hours flew by and I found myself with nearly completed legs and a smooth, squared table top ready for some biscuits! At the end of the day, with the ring of the "clean up time" bell, we all grabbed brooms and brushes to tidy up the shop. It's much easier to come in in the morning to get started in a shop where the table tops aren't coated in dust and the floors aren't riddled with piles of shavings. Today, I will get up close and personal with the biscuits as well as finish up the legs. We are getting closer and closer to a room full of completed tables!

Tuesday, December 4, 2012

Practical Woodworking Day 1

I sit down this morning to write to you about the first day of the Practical Woodworking course here at Lohr's School of Woodworking. I must mention that there is no conceivable way for me to explain even half the information we received so, I highly recommend signing up for the class. Even within the first day, the amount of knowledge you will leave with is worth the tuition alone.

Let me first say, what a day! The day began with eleven students gathering from all around the tri-state area. I was amazed and impressed at the range of people that are attracted to this school. Students from such drastically different professions, backgrounds, and previous woodworking experience levels grouped together as we started with a tour of Jeff's house. He explained to all of us how everything from the foundation to the window sills were built with his own two hands. As we all stand in awe and appreciation for what we see around us, he pointed out the details and reasoning for each part of the building. He explained the months of work that went into the creation of his stunning live wood dining table. He explained how he used veneer from a stunning piece of wood to achieve the patterns and colors found in his sliding doors and bedroom furniture pieces. He explained how even upholsters the couches and chairs you see in the photo above! Each piece, students are told what detail and planning were needed to achieve the final product. Look at some of his work here but, you really have to see these pieces to understand their beauty.

After the tour, we gathered in the "classroom" in the back of the shop. Jeff gave a very thorough lesson on wood as a whole subject area. Paired with his verbal lesson, we were given diagrams, print outs, and visual images on a projector. We learned how/why/when/where trees grow and how it effects the wood we end up working with. Who knew that some trees can only reproduce during forest fires? Crazy! We were told about the grain of the wood and how it is related to the center of the tree. And, amongst other things, I now know the difference between plainsawn and quartersawn lumber. I am almost ready to waltz into a lumber mill and know what I am talking about!

Following the lesson, we were taken around the shop and introduced to each tool and/or machine we will be using for our project. The pros walked us through the steps on how to use each machine for each task we will be faced with while building our tables. Table saws, planers, and jointers galore! We were told and shown how to pick out a good piece of rough wood for whatever projects we may be faced with in the future, taking into account grain, straightness, and any flaws. We were then walked through the process of how to properly cut, joint, and plane the rough wood pieces so that you are left with smooth, straight, and accurately sized pieces of useable wood. Today, we will start with the legs of our tables!

And what a comfortable environment to learn about really sharp, intense power tools; safety was emphasized to the utmost degree. There are safety precautions around every corner and I'm sure we all take comfort in knowing that no student has ever been seriously hurt.

We were then introduced to wood glue and clamps. The varying kinds of glue (and clamps for that matter) were far beyond anything I had ever heard of before. In class, we will be using basic Elmer's wood glue to make seamless joints in our pieces and using an assortment of clamps to hold them together as they dry. No nails, no screws. This is a major part of what I love about the work that comes out of this shop!

Finally, we were assigned out benches for the week (I am lucky 11) and given our three boards. They are the boards that I helped sort and stack last week so I knew we would be handed rough boards but, I was excited just the same! We were given the chance to choose which board we wanted to use for which parts of our soon-to-be tables. With chalk, we loosely outlines which parts would be cut and used for which table parts. Today, we make the first cuts! I will join my classmates now and begin the journey to a completed table.

Monday, December 3, 2012

Cleaning the Shop

This morning, we count down the minutes until students begin to arrive for December's Practical Woodworking Course. This week-long course will teach myself and my fellow students all the basics of practical woodworking. I am beyond excited to feel knowledgeable and accomplished with the fancy new table I will create by the end of the week!

This class does not prepare itself by magic, of course. On Friday, I was faced with my first "clean the shop" day. As four of us scrambled around this monstrous studio trying to rid it of dust and wood chips, the task seemed insurmountable. I was, of course, proven wrong.


To the left, you can see what the shop looked like upon arrival on Friday morning. The top photo was taken from the near the door to enter the shop and the one below it was taken from the rear of the building. Because there are constantly things to be done and messes to be made, it's easy for such a place to find itself in disarray quite frequently. And, let's not forget that, for the most part, it is three men that occupy and work within these walls so a consistent disaster seems inevitable :)

I was assigned to shop vac duty. Who knew there was such a powerful vacuum out there? My first thought was that this suction could do wonders on all the cat hair in my carpets at home. But, for the day, I was just as excited to use it to suck up piles of wood shavings with ease. As I worked my way around the room trying to clean all the corners and crevasses, I took it as an opportunity to learn where things belong. Drill bits go in their correctly sized hole on the shelf at the left front of the shop, sanders belong in the metal cabinet toward the right front, and so on. I'd like to think I am getting the hang of things.

As I mentioned, the class doesn't prepare itself. So, beyond vacuuming, sweeping, dusting, and organizing the contents of the shop, we had to prepare the materials that will be used for the class. To the right, you can see myself (naturally, covered in dust because of my dedication to cleaning) and Eoin bringing down the wood that will soon be eleven beautiful tables. Because I am still an amateur ladder climber, my duty was the stand at the bottom (where it is less likely that I will break anything) and receive each plank to stack in groups of three. Each piece was chosen and labeled specifically for certain parts of the tables. Once all the boards were down and grouped by their pre-labeled numbers, we moved each stack to the back of the room to await their eager student. I was chatting with Eoin about how fulfilling it will be to see myself and my classmates transform these ordinary looking boards into a function and beautiful piece of furniture!

By the time 3:30pm rolled around, the shop looked like a new place! The tools all in their right places, the wood neatly grouped and stacked, the floor swept, and the blackboards ready for instruction. For my fellow students, I can assure you of a clean and tidy learning environment for this week's class. I am very much looking forward to potentially the most informative and interesting job 'training' I might ever experience. I am also extremely pleased to know that I will be surrounded by ten fellow eager learners.

For anyone even slightly interested in enrolling in this Practical Woodworking class, I will be updating daily about our lessons and tasks so you can have an idea of what you would experience here! For those of you that have already taken the course, I hope you can reminisce about your experiences here and come back for one of the more advanced courses!