Monday, December 9, 2013

Progress on Chile-bound Live Edge Tables

Greetings and a belated Happy Thanksgiving from us at Lohr Woodworking!

We are hard at work on the three live edge tables we have been commissioned to make for a Vik Hotel tucked in the hills of Chile. In my last update, we had joined two Bigleaf Maple slabs creating a coffee table with a curved joint held together with floating splines, dovetail bones, and West System Epoxy. Then we removed the bark and sanded her down. Since then, the 12' slab has been treated with boiled linseed oil to bring the unique, detailed burl grain patterns to life. The oil was left to absorb into the wood for a week before we started the finishing process. Jeff is using General Finishes Arm-R-Seal semi-gloss applied with a foam brush to the surfaces of the slab. The top of the slab will have 4-5 coats when all is said and done to ensure that it will protect against the plentiful wine glasses that are sure to grace it's surface. In between each coat, we carefully sand with 400 through 1500 grit to smooth and even the surface before applying the next coat.

Aside from the coffee table, we have been in the midst of creating a small table for the library at the hotel. Another burl slab provides such interesting and lively grain patterns. We tended to the natural splits with a series of small walnut bones.

You can see in the photo to the left, the slab has such a beautiful shape and live edge. In the vein of George Nakashima, we have chosen to leave the natural voids and crevasses as they are. The alternative would have been to fill the voids with epoxy and crushed bark but it was decided that the textured spaces marry too well with the splits to fill them.

This slab, like most of our furniture, was treated with boiled linseed oil. You can see in the 'before' and 'after' photos to the left what a world of difference the oil makes. The slab was then finished with gym seal finish and is currently awaiting the final rub out (using 0000 steel wool and mineral oil to smooth and reduce the shiny/glossy appearance) and the construction of it's base!

The third and final table in the works for this project is a Pennsylvania Brown Oak crotch slab. As the slab was dried, it developed a large split down the center of the crotch but the shape and size were right so, we got the chance to be creative with more bones! Jeff printed some inspirational, skeletal images so we could cut bones in shapes as true to life as possible. As they are structural additions to the 'flesh' of the wood, it is important that they are beautiful and strategically placed. He carefully selected pieces of figured walnut to cut the bones from and designed their shapes and placement.

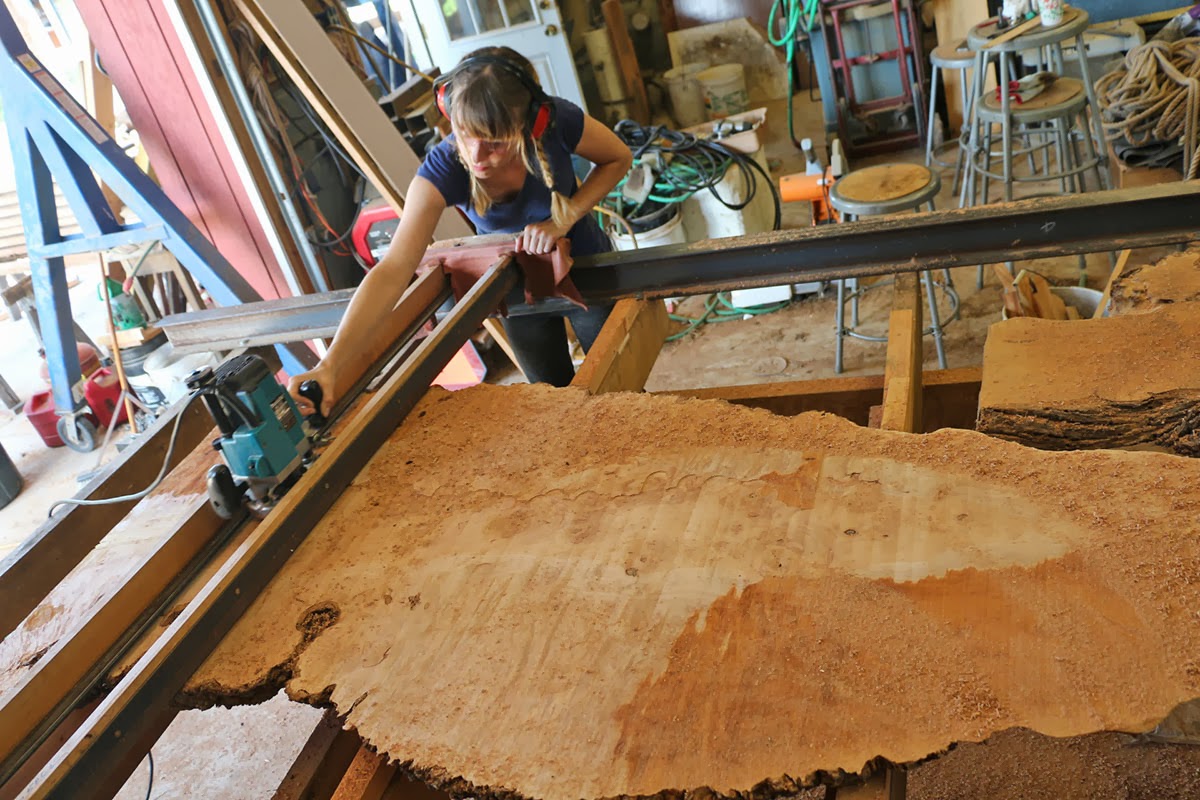
Next, it was my job to take to the router! After the bones has been cut and shaped, I double-face taped them in place and traced carefully around their edges with a marking knife. When the outline was clear, I removed the bones and loaded the plunge router with a 3/8" plunge bit with the depth set to roughly 3/4 the thickness of the bone itself. I set up desk lamps so ensure that I had a most-than-necessary amount of light shining on my work area since the router cuts need to be incredibly precise. I then carefully routered out the space within my outlines, getting to within a 16th of the knife line.


My final passes cut out the material right up to the outline, watching carefully as the fibers split away from the knife lines but doing all I could to avoid going beyond them. From there, I would test the fit of each bone keeping in mind that the goal was to have them fit as close to perfectly as possible. The bones needed to be snug in their holes (enough that they should need to be tapped in with a brass mallet), but not so tight that they would split from the pressure of being glued in.

You can see to the right that when I was finished, the bone slots were shaped for each individual bone and didn't cut all the way through the slab. These bones will serve as a strong structural element to hold the split from getting wider with time and wood expansion/contraction. The board I am holding in my left hand was what we used to apply even pressure to the bone as we lowered it into the slot for the final glue-up.


And then came the glue! We used a two-part epoxy to hold the bones in place. After trying the 5-minute epoxy on the first bone, we realized that it was too thick and the open time wasn't quite enough for us to feel confident that each bone would be bottomed out and placed perfectly before it started to tack. Onto the West System epoxy we went! Although the dry time for the West System is longer, the consistency was much easier to work with and it allowed us ample time to set the bones just as we wanted them.

In the photo to the right, you can see our brass mallet and hammering block on standby to tap the bones into their slots. The two boards underneath and on top of the slab were pulled together (like a sandwich) with c-clamps and helped us to lower the bones toward the edge into place evenly and slowly. It was important that each bone bottomed out into its routered slot so that they fulfill their role as structural and strong additions to the piece. We want to make sure that 100 years from now, the split in this slab remains harnessed, un-extended, and beautifully treated.

Finally, after the epoxy had a day to dry completely, we belt sanded the bones down to be level with slab's surface. The entire slab was then sanded with 80, 120, 180, and 220 grit sandpaper via a random orbit sander. The blunt ends were rounded with files and sanders as well to create the soft, round ends you see to the left. The live edge was de-barked and otherwise left in it's natural state.

And, for the third table in a few weeks, we treated the table top with boiled linseed oil. The brown oak slab now lays drying for the week before we jump into applying finishes to its surfaces.


Now that the table tops are nearly complete, we are onto the design and beginnings of their bases! Look out for an update soon about our current Practical Woodworking course as well as the base construction for these beautiful tables as they make their way to completion!

Saturday, November 23, 2013

Practical Woodworking & Gift Certificates!


A short entry for your Saturday evening:

A huge congratulations to Nancy, the Steves, the Matts, Brian, John, Jim, Mehmet (who came to us all the way from Istanbul), and Gary for being the newest Practical Woodworking graduates! After a week of seemingly overwhelming amounts of information and even more hard work, we have ten students (each still with 10 fingers) who should be nothing short of extremely proud of, and confident in, their woodworking skills. They started the week having their brains filled with wood theory and characteristics and, just a few days later, they have filled the shop with 10 beautiful red oak tables that will stand the test of time. We are lucky to have had the chance to spend the week with these wonderful people and we are hopeful they go on to create (and share) all the wooden masterpieces they can dream up!

In other news, we are happy to introduce JD Lohr School of Woodworking gift certificates in time for the holiday season! Are you a woodworker who has been taught by youtube videos and trial and error? Are you the spouse, parent, sibling, or friend of a woodworker that you are fairly certain runs the risk of losing fingers or limbs every time they head out to the shop? Practical Woodworking is a course built for these folks! What better gift that to give them the gift of a week on a farm learning practical, safe, and repeatable woodworking techniques and practices from a master?

Zero-experience through advanced woodworkers are welcome and encouraged to enroll. Students of all skill levels will walk away from the course with a guaranteed wealth of new information.

Please feel free to learn more about the gift certificates in our online school store!


Until next week, ladies and gentlemen. Check back for an update in the near future about the happenings of the Bigleaf Maple live edge coffee table as we start finishing the top and begin design/construction of it's base! Exciting!

Monday, November 11, 2013

What? Another Shreiner Log Delivery? YES!


Mr. Steve Shreiner has done it again! The alumni of the Lohr School of Woodworking are truly the cream of the crop. On Friday, we were lucky enough to see a Shreiner Tree Care log truck making it's way up the driveway. Rich, the greatest log truck driver in the land, arrived with a filled-to-the-brim load of beautiful logs. Cherry, Walnut, and Oak galore! We couldn't be more excited to receive such a wonderful delivery. We are grateful beyond words. Thank you Steve, Rich, and all those at Shreiner Tree Care!

Rich piloted the huge log-grabbing claw from atop the truck as we watched in awe from below. It was awesome to see huge logs lifted, moved, and twisted with such ease. Rich was up there sorting massive tree trunks; placing the smaller ones aside while he put the bigger ones where they'd be easier for us to move for saw milling. Jeff merely had to point to a space in the yard and, within seconds, Rich dropped the log in it's place. Our usual log-moving routine involves tractors, digging bars, gantries, and some serious muscle, so watching the Shreiner truck in action was a treat. I'm a lady, so I can say it was much like a ballet of log stacking.

It is often said around Lohr Woodworking that one of the best parts of working the wood from the source (log form) is that we are the first to lay our eyes on what is inside of a log when it's cut open. A tree spends it's entire life growing and forming it's rings and grain patterns and we are lucky to, not only reveal the natural patterns to the world but, create furniture that will present them to the human eye throughout the test of time. We now have a yard full of logs just waiting to reveal their inner grain patterns! I can't wait to see what our newest Shreiner logs has waiting for us.
As a new week begins, I can only assume that much if it will be spent at the saw mill breaking into our new goodies. We are excited to know that our saw mill, drying yard, and kiln will be operating at maximum capacity for the coming months. I want to send our greatest of thanks to Steve and Rich for all of their generosity, time, and stunning material! We are grateful to have the pleasure know these kind gentlemen. If you have any tree or landscaping needs, we can assure that you'll receive the utmost care, kindness, and dedication with Steve and the lovely people at Shreiner Tree Care.

Wednesday, October 30, 2013

The Luckiest Chickens

This week, we are in the midst of an Advanced Joinery course and are joined by 8 strapping gentlemen already hard at work building their side tables! We are happy to have these Practical Woodworking alumni return to us for a second visit as we step it up a few notches in this course. There are floating shelves, Green & Greene bread board ends, dovetails, buttons, and drawers galore around these parts!

On another note, it's officially fall in the north east and the chilly weather has demanded that I break out my scarves and heavier coats. At the shop, we have had to fire up the coal stove and maintain a steady fire to keep warm in the mornings until the sun is kind enough to grace us with her presence.

As the only lady in the shop this week, I thought I would be most eager to sport my fall attire but as it turns out, I rank third best in that department. The gang of 22 chickens gather around the back door each afternoon to indulge in their daily "chicken noodle" dinner which is a potful of plain, boiled macaroni noodles (no chicken broth so no worries). Amongst the crew this fall, you'll find that two of the lovely ladies are rocking some awesome fall sweaters. Needless to say, the Janices (Janice & Janice Ian) have won the honor of Best Dressed this season at the Lohr School of Woodworking. Fashion forward fowl is just one of the many things you will find in the Lohr domain that you'd be hard-pressed to find anywhere else on the planet.


Because the photos do all the talking, I'll leave you with this final thought as you carry on the rest of your day with a chickens-in-sweaters induced smile: Linda, the lady of the Lohr domain and mother hen to all the birds/animals, was quoted in saying, "Janice Ian is wearing the more splashy argyle number, while Janice has the beige model with the logo 'I love Mom' and a dog bone. Hey, some chickens are luckier than others."

Check back later this week for an update about the events, procedures, and results of the advanced course that unfolds on the other side of the office wall as I write this. Until next time, cheers and Happy Halloween!

Thursday, October 17, 2013

Live Edge Maple Coffee Table in Progress!


After our trip to Hearne Hardwoods in July, we returned home with two stunning Bigleaf Maple slabs destined to be a long, live edge coffee table. This coffee table is amongst a few tables in the works here at JD Lohr Woodworking that will find their home inside a Vik hotel, perched among the hills of Chile.

As the fall descends upon us in Pennsylvania, we are hard at work making, what were recently, merely slabs into a beautiful coffee table, ideal for many a wine glass to rest upon. But, before I elaborate, I will take a moment to admire mother nature's work. Linda, the lady of the Lohr domain, took a trip to Washington and brought back with her a leaf from a Bigleaf Maple. As someone who is relatively new to the woodworking field, I harbor little-to-no knowledge of trees so this leaf really brought to light how massive the tree that produced these slabs likely was. A leaf as big as your head! Nature is something to be truly appreciated. I'm glad to know that this coffee table will embody the life of it's Bigleaf Maple and allow it to be admired indefinitely.

Planing: The process began with a giant router sled. For slabs as massive as these, we can't exactly rely on our 8" jointer or 24" planer to help us flatten the faces. For that, we have a Lohr-built router sled (which is about the side of a car).  We use a bottom cleaning bit in the router and take several passes, removing thin layers until the entire face is smooth. From there, we have a working face to rest on to duplicate the process on the opposite side ensuring two flat, parallel sides.

Joinery: Then, it was on to some major joinery. Jeff's design called for the two slabs being butt-joined to create one long, fluid table top. But, because this is a Jeff Lohr creation, this table would have no ordinary butt joint; To maintain a natural aesthetic to marry with the live edges, Jeff decided to create a curved joint.

In order to ensure that the curve we cut from the ends of the slabs would join seamlessly, we planned to use template and router with a pattern cutting bit. We first cut the curve into a piece of melamine and shaped it as perfectly as possible. Because the bit will ride along the template, it will replicate the exact shape of the curve in the template and, unfortunately, that means it will duplicate any extraneous bumps or hollows as well. As you can see to the left, we test the fit by holding the seam up to the light to see any gaps or discrepancies so that we can tune them out before we make the cut to the slabs.
From there, the curve was cut and it was onto the floating tenons that would hold everything together. Jeff was quick to create a new, adjustable jig that held the router at 90 degrees and centered on the curved edge while he plunge-cut slots for the tenons to live in.

As you can see, it was delicate and carefully executed process but the end result was 5 floating tenons and a perfect-fit curved joint. We used West System two-part epoxy to hold the tenons in place and ensure the most secure of  joints.

Bark Removal: Because this is a live edge piece, the outside of the table will remain in it's natural, textured state. To see the textured edge however, the bark needs to be removed. If we were to leave the bark in tact, over time it would continue to dry and thus flake and chip off into dust and dirt (which is not ideal for a clean floor).

The first stage of bark removal is to break out all the gouging chisels we can find. Being careful to avoid gouging the wood in the process, we chip away at the bark exposing the natural edge of the slabs. In most cases, the bark breaks away from the wood with ease and gets saved for knot and hole patching. The process is tedious but it provides an unbeatable result. But, the chiseling doesn't do the entire job. There will always be tiny bits that won't break from the edge and for those pieces we take to the sandblaster!
We set the slab(s) up on saw horses outside and take to the edges with a sandblaster. Jeff suited up and blasted away any remaining bark pieces. The result of the sandblaster is ideal because it doesn't leave behind any unwanted marks or scratches that something like a wire brush would create. As you can see to the right, the edge is so beautiful and unique when it is fully exposed.

Progress on the Vina Vik live edge, maple coffee table will continue this week and next. Look for another update soon all about creating, cutting, and setting bones along the curved joint!

Thursday, October 10, 2013

The 2014 Woodworking Course Schedules are Here!

While the government is shut down to sort out their differences, we are focusing on what all Americans (and people of the world) have in common- a love of woodworking, of course!

In honor of new bills, new healthcare, and the new year we have posted the new 2014 Course Schedules! Practical Woodworking courses galore! What better year than 2014 to spend a week in Schwenksville, PA with us learning about the practical, safe, and beautiful approach to woodworking and furniture-making, right? Better yet, if you hurry, we have just a couple of benches left open before the end of the year!

If you don't know about the courses we offer here at the JD Lohr School of Woodworking, let's discuss our Practical Woodworking course. If you read my past entries, you'll see several thorough recaps of our 6-day, intensive woodworking course. In summary, during the 48 hour class, 11 students (provides an unbeatable 3:1 student to instructor ratio) learn wood theory and behavior, how to select and mill wood from the rough, how to plan and design a furniture piece, using machinery (table saw, jointer, planer, router, etc), mortise and tenon joinery, jig development, finishing, and more. At the end of the course, students go home with a completed hall table that is styled with their own personal details. If the course sounds appealing, feel free peruse the updated schedule to see when you can join us!

Speaking of Practical Woodworking, I want to thank yet another group of fantastic woodworking students for gracing the shop with their presence last week. Each student came with their eager, motivated minds and hands and it made for a wonderful week! To Tom, Brandon, Candace, Seth, Rob, Chuck, Lex, Joel, and Kim, we want to say congratulations and we hope you enjoyed your time here! We hope to see some pictures of those awesome red oak hall tables when they are finished!

Check back next week for progress on the live edge maple coffee table destined for Chile!

Thursday, October 3, 2013

JD Lohr School of Woodworking Update!

As we find ourselves in the midst of another week-long Practical Woodworking course at the shop, I wanted to thank our most recent JD Lohr School of Woodworking alumni. To Phil, Bobby, Allen, Mark, Tom, Denise, Joe, Nick, Josh, Nate, and Pete, I want to say congratulations for your course completion and, more importantly, your hard work and enthusiastic attitudes. It was a pleasure hosting all of you and we hope to see some pictures of those beautiful hall tables when they're finished! Keep up the hard work!

My blog updates have been infrequent because things have been busy, busy around Lohr Woodworking. As you may remember from my past entry, Woodcraft Magazine was here to document and write an article featuring Rob's step-by-step process to build the Jeff Lohr designed Morris chair. Well, ladies and gentlemen, the print and sale date has arrived; so, be sure to keep an eye out for the latest issue of Woodcraft Magazine in stores now! Rob graces the cover along side the Morris chair. In it, you can read the entire process (including the jigs necessary) to build the Morris chair yourself. Rob talks about the chair construction, design, processes, and finishing so the 10+ page article really is a must-read.

Thanks again to Woodcraft Magazine and all those involved in the execution and wonderful completion of the article!

Beyond the Woodcraft Magazine article and ongoing classes, we have been working hard on a new website for the woodworking school. As it nears completion, you can now visit: www.jdlohrschoolofwoodworking.com for all of your JD Lohr School of Woodworking needs and information! We have been working hard to gather new photos, course schedules, enrollment forms, and even the beginnings of a school store for our current, future, and past students to enjoy! Feel free to explore the new site and keep checking back for our ongoing updates and added information! The original site, www.jdlohrwood.com is still up and running so keep up your Jeff Lohr furniture gallery explorations there!


We are also deep into the design and construction of a table destined for a resort in Chile. After scoping out and taking home two beautiful maple slabs from Hearne Hardwoods, we have taken to the router sled jig to flatten the faces and now Jeff is onto some beautiful and intricate curved joinery. The piece will be a long, live edge coffee table so be sure to look out for upcoming blog updates outlining and documenting our progress on this big, beautiful piece before it makes it's way across the world.


Monday, August 26, 2013

Advanced Joinery Class of August 2013!

Although my absence for a week may have suggested otherwise, we have not had a dull moment here at The Lohr School of Woodworking! Last week we were graced with the presence of 8 eager and animated gentlemen as they tackled the Advanced Joinery class.

Ted, Buzz, Mike, Steve, Stephen, Chris, Randy, and Randy aka Arkansas were dedicated and quite amusing as they learned the more detailed and intricate techniques necessary to complete the project for this course. The more intricate details I refer to include drawer construction, mortise and tenon joinery, dovetail (hand and machine cut) joinery, buttons, floating shelves, Green & Greene style breadboard ends, and so on.

All students are required to complete the Practical Woodworking course at our school prior to enrolling in the Advanced Joinery class. Because of this requirement, when these gentlemen walked through our shop door last week, it was their second stay with us. It seems that having spent 6 long and busy days with us during the Practical Woods class in the past causes students to walk through our door excited, comfortable, and prepared for round 2. The comradery was instantaneous and carried on throughout the entirety of week. Even though I haven't assumed any formal teaching role in the advanced course yet, and hadn't had the good fortune of meeting most of these men before last week, I still felt like I was hanging out with 8 close friends by the end of the week.

As you can see, the sanding pavilion was in full swing thanks to the weather treating us so well as the students learned and created some stunning walnut and cherry side tables. The men made jokes as they got their hands on countless additional Jeffry Lohr original jigs paired with the usual machines; bandsaw, mortiser, routers, and tablesaws. This time around, however, students get their hands on far more hand tools and operations than the Practical Woodworking course requires. The gentlemen had to fine tune their hand saw, marking knife, chisel and mallet, and detailed sanding and gluing skills. All the while though, Rob and Jeff were there to remind us that most any question can be answered with the Jeff Lohr mantra, "All things will be revealed."

One of the more interesting (and often frustrating) operations in woodworking is learning to deal with dovetails. The joinery is undeniably beautiful and strong but, the jigs aren't always willing to be easy on the user. After the bulk of one day of the course being dedicating to hand-cutting dovetails, the students move onto the routers. Jeff does a thorough job explaining jig types and how to adjust them in order to provide fitted and proper dovetails but, that doesn't eliminate the fact that each student needs to adjust those jigs when they sit down to being their drawer joinery. Luckily, we had a shop full of students like Steve (pictured left) and his constant enthusiasm to bring light to even the most challenging tasks.

As I said, comradery was not missing from this bunch of guys. When glue up day finally arrived, a strong desire for perfection was not lacking so teamwork was essential. In order for the tables to function as intended (drawers that open and close, shelves that float perfectly between legs, and breadboard ends that hold everything in place), all things needed to be level, square, and aligned. Just as they did throughout the week, the gentlemen showed full dedication and soon enough the room was filled with assembled tables. In six very busy, rather intense days of instruction and work, there were 8 beautiful tables ready to find their way home.

A huge thanks to the Advanced Joinery Class of August 2013! Although the week demanded a lot and was fast-paced at times, you all wore a smile and delivered in production. I am happy to have had the chance to spend the week with all of you gents and I hope to see some photos of finished tables in the coming weeks! A special thanks to Chris & his thoughtful daughter for making the staff some fantastic (and incredibly appropriate) t-shirts! We'll wear them with pride.

And, as a final note, I will mention that Rob will grace the cover of Woodcraft Magazine on October 1st's issue AND we are working on the construction of a new website so keep checking back with us to see it's official launch!

Thursday, August 8, 2013

Lohr Woodworking hosts VFES Summer L.I.F.E. Camp!

This week we are excited and happy to welcome a stellar group of students from the VFES Summer L.I.F.E. Camp!

In honor of the quickly passing summer, we have been busy in the shop making folding red oak lawn chairs. The chairs will be finished with linseed oil and assembled with hardware that won't rust from outside use. Each of the four students is working hard to make their own chair to take home as they work together through the new woodworking techniques and processes; And what a fantastic job they've done!
 Each day begins with a demonstration of the tasks to be carried out that day. Jeff, Rob, and I worked for the past few weeks to prepare jigs and organize lessons with the most efficient techniques to finish the four chairs in just five days. For the first time, I tried my hand at making jigs and, so far [knock on wood], they have been successful!


Josh, Waimond, Tim, and Marybeth have been 
 quick to learn and seemingly excited to see their work coming along so well in just a couple of short days!

Early this week, the students started with red oak boards milled-to-thickness. They were responsible for tracing the leg shape templates and taking to the band and jig saws to cut out those shapes. From there, we used the router, files, and sanding blocks to fine tune the shape and break the edges.
On Day 2, students were given 16 milled slats. They had to choose 7 to serve as the chair seat and 9 to create the back. When they had their seats and backs labeled as such, they took to the drill press jigs to drill four clearance holes in each slat. In the meantime, they were beveling the ends of the slats, countersinking drilled holes with a brace and bit, and sanding all their parts to perfection.

By Wednesday, the students were ahead of the curve. They honed their sanding skills and moved on to the first stage of assembly. They attached a strut between the set of back legs and a shorter strut between the seat legs. This required some careful center-marking and clamp work but, they didn't miss a beat! After their U-shaped bases were screwed together, they moved on to counter-sinking the four pilot holes in each slat as well as using the scroll saw to cut a hand-hold curve into their top chair slat.


With a few moments to spare before the rain began on Wednesday afternoon, Jeff and Rob took us outside to learn about the physics that we use in woodworking!

Starting with a demonstration about levers, Jeff stood on one end of a board balanced like a seesaw and had students try and lift his weight from the opposite end. Each time, he shifted the placement of the board to differing points along the fulcrum to show how the weight distribution changes how difficult it is to lift the load.

The second lesson addressed pulleys.  Jeff started by having the three boys of the class lift his weight using the rope attached to a single pulley hung from the beam of the sawmill.  The boys got him up off the ground but it was a challenge that took every ounce of their strength.  Next, he had the one girl in the class lift his weight using the rope passing through a four sheave block and tackle which enabled her to lift Jeff high off the ground with ease. He explained how a single pulley set up simply does the work of one man but when four pulleys are employed in conjunction with one another, it allows a single man to do the work of four men. It was a great way for students to see how we use these physics methods to move big logs and boards around the saw mill regularly.

On Thursday, we finished up any last minute sanding before we starting in on finishing! The campers got a hands-on (or, more accurately, a hands-off) chemistry lesson. At Lohr Woodworking, we aim to keep all our furniture as natural as possible so we avoid the use of stains or paints. Instead, we enhance the natural grain colors and patterns of the wood with boiled linseed oil. It is easy to apply and works wonderfully so we decided it would be best for the campers to use on their chairs. One major concern when it comes to this type of oil is how to handle the dampened rags when the finishing process is done. The rags can spontaneously combust because "when linseed oil is exposed to air, it combines with the oxygen molecules. This chemical reaction creates heat. If the linseed oil is on a rag in a pile or ball, the heat can't escape and, as you can see from the photo of our experiment, can reach extreme heat within just a couple of hours. Instead of balling them up, we hang them to dry over the rungs of a ladder so that the heat being created can cool on all sides of the rag as it dries. After a few days, the reaction is complete and the rag becomes stiff- then they are safe to throw away with the normal garbage.

After the chemistry lesson, students took to finishing their chairs with the linseed oil! With the table tops covered in plastic and some sticks to elevate the pieces for drying, they did a great job wiping on the oil to cover every inch of surface. The colors and grain of the red oak popped just as beautifully as we had hoped!

On Friday, everything came together! With all the chair pieces linseed oiled and started to dry over night, on Friday morning, we were ready for assembly. Last week, the Lohr Woodworking staff made a few assembly jigs that needed a bit of explaining. The backs and seats had separate jigs for attaching the slats. As the legs sit in a bed-like jig, there are stops and guides for each slat to sit while the pilot holes are drilled. We drilled pilot holes because red oak is a hardwood so, nailing straight into it greatly increases the risk of bending nails. From there, the students used good ol' fashion hammer and nails to attach the 16 slats. The slats were held on with stainless steel trim nails so that when the chairs are inevitably left outside, the nails won't rust! The jigs held the u-shapes up off the table so that they don't rock or bounce as they were hammering the nails. I heard from more than one camper that "it was time for the fun part -- hammer and nails!"

After the nails were set and the slats fully attached, we had
students go back to set the nails below the surface of the wood. We wanted to make sure to avoid any future clothing snags on a nail sticking up above the surface.

To do this, each student used a drift. The tip of the drift was carefully held on top of the nail head and hit once or twice with a good hammer swing. Although frustrating at times, drifts do a good job of setting those nails properly.

Overall, assembly went quickly and smoothly. The chairs quickly turned from a pile of parts into foldable, usable lawn chairs! We are always excited for the final stages of assembly, not matter the project. You can't help but feel proud and fulfilled when all your hard work comes together into one functional, beautiful furniture piece. The campers were no exception to this feeling. They exceeded our expectations this week and hope that they are as proud as we are!

We were able to snap a goofy photo of the campers lounging in their chairs before they left. All the teachers and staff were such a wonderful part of the camp as well. We are grateful to parents, teachers, and campers alike for the chance to spend the week with such passionate and excited kids. We tackled a lot of tools, machines, techniques, and problem-solving together. Thanks to VFES Summer L.I.F.E. Camp for allowing us to create this course and thanks to EVERYONE else for such a fun week!

Monday, August 5, 2013

I am basically a pro with an Alaskan chainsaw mill

While Woodcraft was here to document all things Morris chair related, Jeff and I made ourselves scarce (and busy) by taking to the saw mill!

We spent two days slicing live edge slabs with the Alaskan chainsaw mill. Although I may not be a master of the 6-ft long chainsaw just yet, a few days of intensive practice definitely brought me closer to such a title. I can now oil, gas, sharpen, and start up a chainsaw all by myself! ::pats self on back:: This log was a cherry tree from which came several 2 1/4" thick crotch, live edge slabs with stunning figure. They have been coated in Anchorseal to protect said figure and any checks that might want to form.
While we were working, Donna and/or Tom snuck out and captured us in action. Beyond the fact that I now feel like somewhat of a woodworking celebrity, for those that may have doubted my scrawny build's ability to man a chainsaw, here is a bit of undeniable proof. Despite the heavy Pennsylvanian heat this summer, we now have cut and stacked a huge collection of live edge slabs. They have begun the drying process and, thus, are a few weeks closer to being usable. We are already anxious for them to finish drying!

Again, a huge thanks to Donna Chiarelli and Tom for such wonderful work on the Woodcraft Magazine article and now for sharing these photos with us! And, an additional thank you to Steve at Shreiner Tree Care for providing the beautiful logs, without which I wouldn't have been able to hone my awesome chainsaw skills a few weeks ago!

Friday, July 26, 2013

Woodcraft Magazine comes to visit!

What an exciting week it has been here at the shop! Woodcraft Magazine was here making the Lohr Woodworking staff feel like a bit more like rock stars for two days.


Jim, the Editor-in-Chief at Woodcraft Magazine, contacted Jeff in April to inquire about his Lohr-design Morris Chairs. What he proposed was a a cover project in which the designer and builder would get a short bio and a full article detailing the "how to" steps to building the chair. The plans for the chair would be shared with readers and used beyond just the article in the form of downloads, paper plans, and so on. They would come to our shop and photograph the steps, tools, and techniques as he constructed one of his chairs and it's ottoman.


Jeff was willing to share his design and plans with the world so, he accepted the Woodcraft Magazine article offer but, he requested that his second-in-command, Rob, take the reigns as front man/producer. Rob had been doing an impressive amount of preparation, planning, organizing (and, of course, wardrobe selection) in the weeks leading to this one so, I have been anxious to see it all unfold; And, unfold it did!


Tuesday morning, the shop was graced with the presence of Jim (the Editor-in-Chief) and Chad (the Art Director) from Woodcraft. In charge of the article photography was Donna Chiarelli and her assistant, Tom. What a tremendous team they formed! They were here for two days and managed to fully document a chair construction that takes around 100 hours to complete. Everyone had such a pleasant attitude and the shop was filled with structure, professionalism, genuine interest, and even some jokes and smiles to add to the ambiance. It was incredibly impressive to watch all five cooks in the kitchen working so harmoniously to exchange ideas and tactics to best encompass the visual and written process for readers.
The idea was to capture the "mysteries or more challenging steps of the process" in photograph form so that readers could have a clearer idea of what to do on their own. Rob worked closely with Jim to create a photo script to encapsulate the chair creation process.

From what I saw, Rob was a natural magazine article star. Being surrounded by lights and cameras seemed to be second nature as he showed the magazine world how to make a killer Morris Chair one step at a time.
Eoin was kind enough to snap all these photos of the photo shoots that took place on Monday and Tuesday but, to learn how to make a JD Lohr Morris Chair and see the front angle of the cover photo (as well as the Morris Chair in it's entirety), you'll need to invest in September's issue of Woodcraft Magazine!

The staff of Lohr Woodworking thank Woodcraft Magazine, Jim, Chad, Donna, and Tom for their hard word and such a wonderful opportunity. As I mentioned, this week was enormously enjoyable and appreciated. We are a small operation here but, Jeff and Rob's work is astounding so we are always grateful to those who acknowledge and share the beauty of the furniture.

Make sure to keep an eye out for Rob's magazine cover debut in a couple of months! And, bonus, learn how to make a Lohr Morris Chair for yourself!