Thursday, December 27, 2012

Cemetery Maple vs. Saw Mill

Returning from a warm, humid Christmas in Florida, I have found that the chilly 30s and rain/snow here at home seem so much more like -15s and sleet. Regardless, I am here, with layers on, ready to head into another day at the shop. Today's update will be about what we tackled last week on Wednesday and, what I will call, 'the day the cemetery maple met the saw mill'.

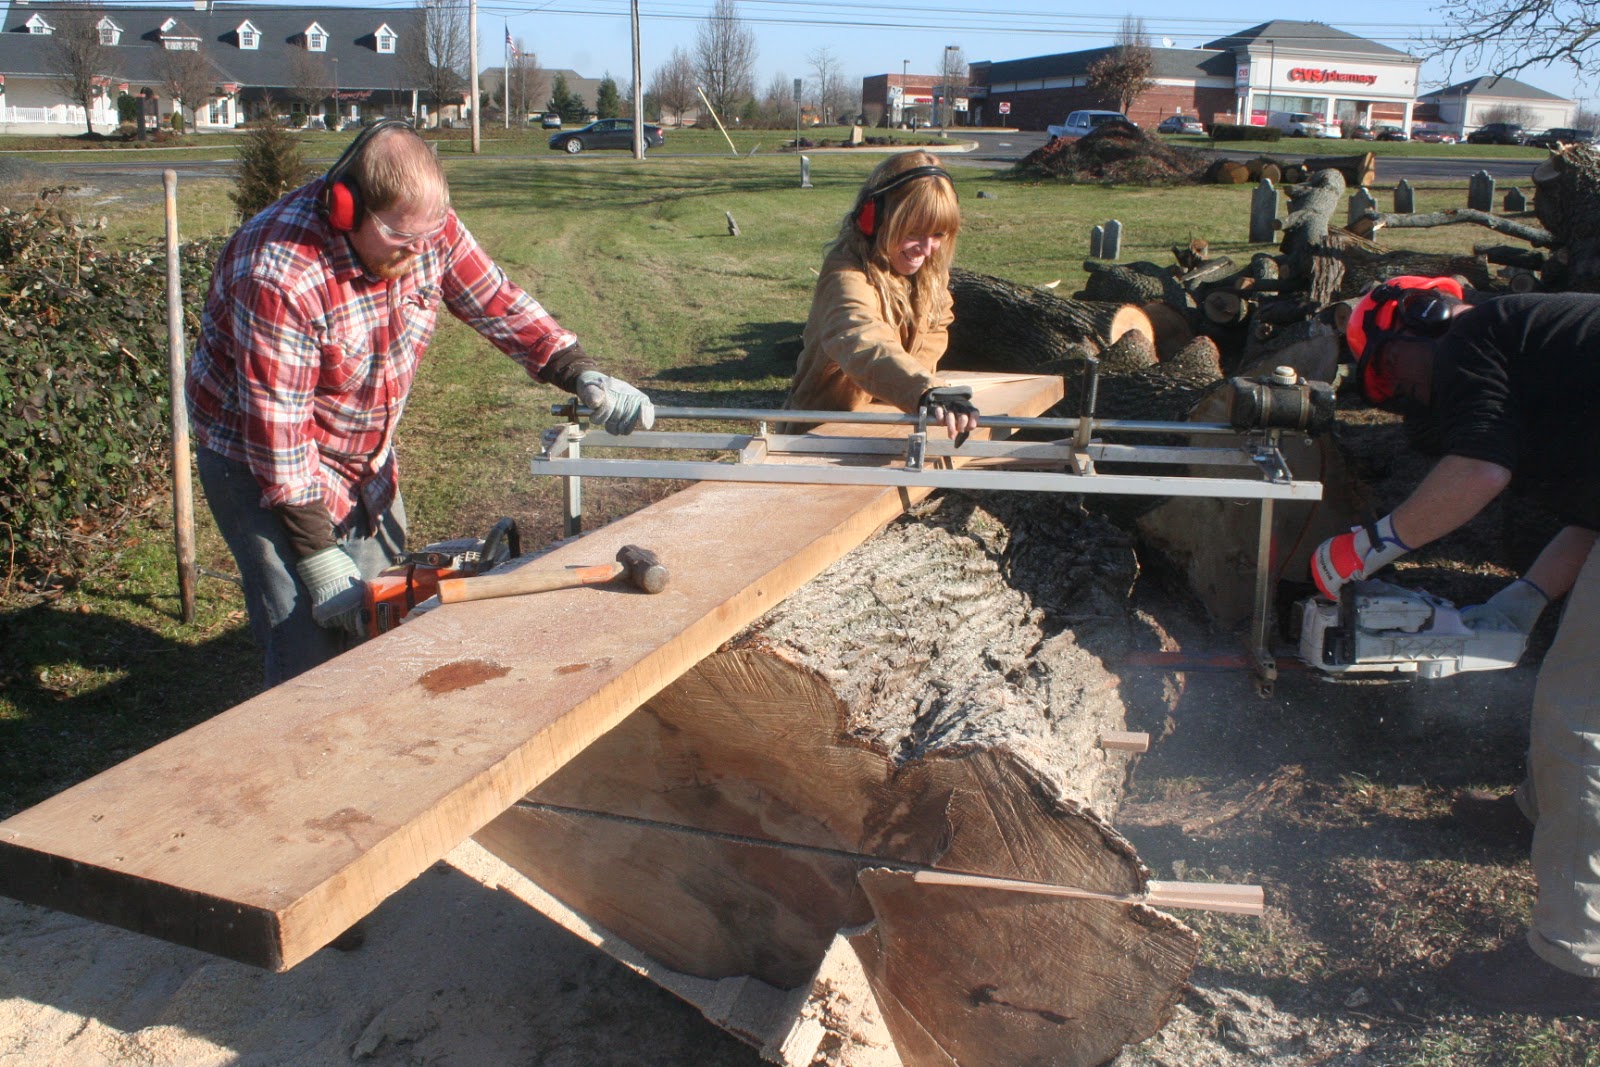
The saw mill we have here at the shop is a lot like a giant horizontal band saw. It is a big circular blade that rotates at a quick speed, and paired with lubrication via windshield washer fluid, can cut through massive pieces of wood. The blade runs between two big wheels inside the blue boxes you see in the photo and the whole mechanism rolls on wheels down the tracks. The piece to be cut is stabilized with metal spikes (and wedges when necessary) attached to the base of the saw mill. From there, the saw blade height can be adjusted (to make the depth of the cut whatever you so desire) and is pushed down the tracks to create a flat, level cut. This cut is a working face now to provide a flat, level surface from which to cut the remaining sides. We started with an oak log and cut flat faces on each side to assess which way the boards should be cut. Taking into account the hardwood/softwood, tightness of the grain, and any flaws, we decided which side of the log to cut our boards. As the boards were cut, they were stacked on sawing horses to remain flat while they started to dry. We made sure to take a dust brush to them to make sure no excess sawdust would gather and create an environment for mold to grow during the drying.

Once the oak log was cut into boards, we were faced with the mission of the maple logs we had cut and collected at the cemetery the week prior. These logs are not light and/or easily moved around. I learned to appreciate cant hooks, which are long handled tools (like a rake or shovel) with a hook at the end and used in a lever-type fashion to allow people to move such massive pieces of wood. With the help of cant hooks and gentlemen stronger than what my 113 lbs can supply, we managed to cut two of these massive logs over the course of then day.

I even got to try my hand at pushing the saw. It was surprisingly easy to push through such a hard material. But, naturally, during my first attempt, I hit a knot that had filled with dirt and stones from moving it around on the driveway. Thin, fast-moving blades don't agree with stones so we had to change the blade and cut out the knot with a chainsaw before I was able to make a complete cut. You can see the saw horses set up under the overhang for the boards to dry in this photo. They'll stay there until we move them over to the drying racks behind the barn.

The maple ended up having some beautiful curl to it. Here, I am standing with a book match cut from one of the maple logs. A book match is just as it sounds, mirror copies of grain patterns that result from opening a cut like a book. As you can see, the colors, patterns, and curl are so beautiful we were happy that Jeff happened to drive by the cemetery that day. Now, the boards will dry for about two years (because most were cut around 2" of thickness). Maybe, just maybe, I will get a chance to be a part of the creation that comes from these boards in a couple of years.

And, on a final (and somewhat irrelevant) note, I learned to drive a tractor! The most challenging motor vehicle I have had to drive in the past was my father's Mazda 5-speed pick-up so this was a whole new world. They refer to the John Deer as the Cadillac of tractors on the property and I understand why now. It's so easy to learn and use. From the first few cuts of the logs, we got throw away pieces that couldn't be used for anything so they were dubbed firewood. Now, they came from heavy logs and just because they were sliced a bit thinner didn't mean they were light, especially when we were dealing with 10+ of them. Thus, my tractor skills came into play. I was responsible for moving the firewood to the pile after it was chopped up via chainsaw. The tractor is far more fun to drive than my Buick.

At the end of the day, my hands were somewhat numb and I was coated in an awesome sawdust and windshield washer fluid mixture but, I could look at the drying stack of boards and be proud of how much wood we had done. And, I had learned to drive a tractor! I enjoyed my first day down at the saw mill and I enhanced my woodworking vocabulary a bit more.

Now, on to today's tasks. I hope you all had the happiest of holidays!

Wednesday, December 19, 2012

Revolutionary War Maple Part II

This post will be image heavy filled with photos from our day(s) of logging at the cemetery! Because it was such a new and interesting experience, I want to be sure to share with you all the documentation I can get my hands on!

To the left, you can see Rob, Eoin, and me making the first cut into the maple log. We had to use a straight board on top of the log, supported with wedges, in order to make sure the Alaskan chainsaw mill had something level to rest on as we guided it through the log. We were cutting off the top portion of the log so we could try to get the biggest slabs possible from the middle. The top and bottom thirds would later be cut into quarters to come back with us, as well!
Jeff and I high-five in celebration of my first success with the Alaskan chainsaw mill. What a powerful machine! If my arms weren't already aching from unloading, sorting, and stacking the lumber load earlier last week, using this chainsaw did the trick. Although the machine is designed to make your life as easy as possible with the stabilizing bar and two motors to drive the blade, it was still a task to push/pull it through such a massive and heavy log. As I mentioned before, and you can see in the photo, we used a mallet to drive wedges every 8" or so into the cut so that the pressure of the freshly cut wood wouldn't weigh on the blade and damage it or prevent it from rotating.
Also, as I mentioned in the previous post, this tree is a part of our nations history by growing from a ground shared with Revolutionary War soldiers. We were all proud to work amongst the memories of the fallen soldiers. Although we kept our distance out of respect (and to avoid caving in any old pine coffins that are likely to be lacking much strength after almost 300 years), we snagged a photograph with one of the many flags and pendants that mark the headstones of said soldiers.

If I haven't discussed it before, this tree wasn't taken down for our use; it fell on its own from age and rot. And, I am happy to know it can extend it's role in history comfortably in someone's home represented proudly as a unique, beautiful piece of furniture.


The men went back for a second day of logging. Unfortunately, I had to fulfill my role as a teacher on Friday so I had to miss a second day of fun but, they were sure to document their adventures so I am pleased to share those photos with you. I notice a lack of Alaskan chainsaw mill on this second day so I am pretty pleased to know I chose the right day to go logging! Anyway, onwards to the photos of lumberjack men cutting some more cemetery maple to pieces:

Just think, just a few short years from now this beautiful curly maple will be dried and ready to use. The next time you notice a wooden creation in your presence, take a moment to think about how much work had to have happened before this object made it to you. This day of logging really gave me some insight into how much there is to appreciate about wooden pieces, especially those built with real care, thought, and effort. Until next time, ladies and gentlemen, I bid you a lovely Wednesday!

Monday, December 17, 2012

The Revolutionary War Maple

A bit later than promised but, alas, I am here to tell you about our logging adventures on Thursday!

Earlier in the week, Jeff spotted a fallen maple in a cemetery not far from the shop. After chatting with the groundskeeper, we got the go-ahead to slice up some of the trunk for what we hoped would be curly maple slabs. Jeff and Rob and taken a small part of the tree earlier in the week and cut into it to see if it was worthwhile. Even the small portion they cut from showed beautiful patterns in the softwood. So, first thing Thursday morning, we packed up supplies and Trixie the tractor for the trek to the cemetery and spent the day dissecting the truck of a 130+ year old maple tree.

Here, you can see the portion of the truck we cut the slabs from. The picture gives perspective on just how big and thick it's trunk was. The way that the tree had been cut after it had fallen made much of it too short to be used for much furniture purposes so we worked mostly with this big truck log to get useable pieces.

We made the log stable on the ground with wedges and broke out the Alaskan chainsaw mill. This impressive machine is essentially two chainsaw motors attached to one another with an extremely long bar and chain. There is a adjustable stabilizer that attaches above the blade so that it maintains a straight cut throughout. Because of the immense size of this log, we had no choice but to break out the big guns... and it was awesome! After cutting off the top portion of the log, we had a straight, flat base to drag the chainsaw along for cutting useable 2" slabs.

I was lucky enough to get a go at such a crazy machine. I have seen a chainsaw used in my day; I do, after all, have a father that loves maintaining his yard as much as the next guy. But, this chainsaw is a whole different story. Because of it's length and the size of the log, we had to use wedges every 8" or so to keep the already-cut portion elevated enough to alleviate the pressure the heavy wood was putting on the blade. Beyond that, even though we were using newly sharpened blades, it took at least an hour to cut each slab! I am appreciating anything made of real wood more and more each day!

As we spend the morning breaking this massive log into manageable pieces, we are surrounded by the gravestones of Revolutionary war soldiers. Over our sandwiches at lunchtime, the groundskeeper came over and was kind enough to share some of the history of the land this tree grew from. He told us that the oldest headstone they have found in the cemetery so far was from the 1700s. Several of the stones were marked with American flags waving and a pendant proudly displaying a soldier and the words "Revolutionary War". This tree had been growing amongst the original American heroes.

I am still adjusting to living in a place with so much history. I am proud and excited to know that the slabs and boards taken from this aged, historic tree are going to be used to make long-lasting, beautiful furniture pieces instead of pieces of firewood to be burned and forgotten.

After lunch and cutting the two big slabs we could from the log, we used a smaller chainsaw, some iron wedges, and a sledge hammer to break the remaining large pieces of log into quarters. I imagine that every bit of useable wood there is from this log will be so, we needed to get it all back to the shop; cue Trixie. She did her job to carry these huge, heavy logs up to the trailer to be brought back with us. Between the hours of cutting, hammering, chainsawing, and lifting, 3 o'clock was welcomed by all of us. And, now those slabs will be ready to use in about 2.5 years when they dry properly.

Upon our arrival back at the shop, the guys took a small board from the haul that day and planed it to see what curliness there was to be seen. I can tell you one thing, this photograph doesn't do it justice. As the wood shifts in the light, the curls shine and move. It's incredible that nature produces these things and keeps them hidden deep in the layers of it's trees' trunks. We were all so pleased with the results of our labors. I was overwhelmed with, yet again, another day full of new and exciting knowledge. This job is a bottomless pit of new experiences! I'm glad to have survived my first day of logging!

We have some more photographs of our day with the Revolutionary War Tree that I will be posting on Wednesday so keep you're eye out for those! Until Wednesday, I bid you all a good night.

Thursday, December 13, 2012

Back to Apprentice-ing

I didn't get a chance to sit down to write about our day at the shop on Tuesday so today will be a day of two posts! How exciting, I know.

I should make sure to mention that the shop isn't usually open on Mondays so Tuesday is our Monday. After having class for six days last week, it was time to return to "normal" daily life around here. In the morning, we dug out some old pieces of equipment and reorganized a bit. Soon enough, though, our lumber shipment came in. I have never ordered nor received a lumber shipment before so this was, yet again, a first time event for me. A big truck with a back filled with wooden boards, backed up to the big door at the rear of the shop and a friendly driver handed us our load two boards at time.

I don't know the exact order but, I would guess that there were about 100 red oak boards and 10-20 walnut boards. Between the three of us, it didn't take too long to bring them all into the shop but, I will tell you that they were not light for a 5'4", 117lb young lady to carry around. I held my own though! I have sore arms today to prove it.

Here are some photos of the walnut boards. I took this picture because I learned a very important lesson about the drying of wood on Tuesday. Wood boards should be left to dry flat outside in the natural air for roughly a year for every inch of thickness. Then, it can be brought into a kiln to drop the moisture down a final few percentage points so the boards are useable knowing that they won't warp or expand/contract too much. Naturally, people don't want to wait years for their wood to dry, they want it immediately so that they can build what they please. Because of this demand, lumber companies have developed kilns that dry the wood at a far quicker pace but, the sacrifice is lost in the color and the ticks and breaks in the end grains. These walnut boards were dried in a speedy kiln and are much darker and grayer than the walnut that was dried naturally here on the property.
Back to the lumber delivery. As we took our two boards, we had to look at their width, straightness, and grain patterns in order to sort them. There red oak boards are destined to be made into tables by our next Practical Woodworking course in January. We had three tables; one for boards that would serve best as legs, one for boards that would make good table tops, and one for boards that would serve as skirt boards. Once all the boards were off the truck, Rob and I were responsible for the next step(s). We were to start with ten table top boards laid out on the biggest work bench. From there, we were to find a leg board that matched in color tone for each table top board and stack it on top of it's new mate. Next, the skirt boards, following the same general rule. Soon we had ten stacks of three boards each. Sigh of relief, I was finally done lifting and moving these heavy boards. NOT. We made twenty more piles of three so that we had the wood prepped and sorted for the next three classes. At this point, my arms were telling my brain that they quit but, my brain was telling them to drink a Diet Coke, wake up, and keep going. And, so I did. Rob and I continued as a team as we stacked these 90 boards on shelves eight-ish feet high on the wall to wait until our next class of students comes along to cut them up into table pieces. I hope at least one of you readers takes the Practical Woodworking course so that you can know how much thought, effort, and pain went into organizing the boards that will eventually become your tables.

Finally, the day was winding down. I felt it was only fitting to capture of picture of Jeff paying the bill for our lumber. I know it hurts to write a check so big but, I also know how happy a room full of students will be to receive those boards in a few weeks from now.

So, I survived my first lumber delivery. My arms have been reminding me of that for two days as they have been consistently aching. And, I can't reach the top shelf in my kitchen because the muscles decided they don't want to extend so far. I have high hopes that they will change their mind in a couple of days. Until then, I thought I would try to stick to small jobs and catching up my blog. I thought wrong. In my next post, you'll read about how we cut slabs from a fallen Revolutionary War, cemetery tree.

Monday, December 10, 2012

Practical Woodworking Day 6

Saturday wrapped up our December Practical Woodworking course. I was sad to see my 10 fellow classmates depart back to their corners of the world but, I was so impressed to look around the room at the end of the afternoon and see the nearly completed, beautiful tables and smiles to match! I can assume that my classmates can agree that the week was not only incredibly informative, but also a unique and overwhelmingly enjoyable experience. I am so excited to know that within the coming months, I will be playing an active role in the teaching of this course! I am also crawling out of my skin in anticipation of using the knowledge I have begun to acquire about this craft to create and help build so many pieces!

As I closed my last entry, I mentioned that, even after an afternoon filled with it, I had to jump back into sanding on Saturday morning. There are so many surfaces to be sanded and so many edges to be broken for this table. Between four legs, four skirt boards, and the table top itself, I thought the sanding would never end. Each surface had to be sanded down with 80-grit paper, followed by 120-grit, then 180, and finally 220. As you can probably tell by the photograph, I am basically a pro with a sanding machine now.
When the sanding was done, our next mission was to glue our bases together! During the lesson on how to properly glue the base of the table together, Rob mentioned that this was the part that some people would find themselves freaking out over because it's one of the final steps. Naturally, I had already known that freaking out was in my near future because I had spent so many hours working so hard on my first wooden creation that I was bound to mess it up during the final stages. Luckily, the environment in the shop makes it easy to ignore my nervous subconscious trying to butt in and focus on how excited we all were. First, we dry clamped the table base together. Table gluing is a partner activity since it has to be done so quickly (10 minutes before the glue starts to dry) and everything has to fit so tightly. Here, Steve and I are working on gluing my table base together. The dry clamp showed that I had no major issues and everything fit flush up against one another so we moved on to the glue. Using small paint brushes, we put glue in the long sides of the mortises and on the sides of the tenons so they would hold together tightly. Keeping in mind that we didn't want glue seeping out of those crevasses, we had to be sure to use the right amount and wipe away any excess glue with toothbrushes. Once the glue was in place, we put all the pieces together and clamped it up. Six clamps were used for each table to make sure that the pressure being distributed on the mortise/tenon joint was even. We then set the tables aside to dry for at least an hour while we moved on to finish sanding out table tops and learn about finishing!

Learning about finishing was our last lesson of the course. We all gathered around a big work bench to get the low-down on stains, oils, and varnishes/polyurethanes from Rob and Eoin. I should note that these lessons include such a vast array of information that I couldn't even begin to repeat in as much detail as the are delivered. Just to give you an idea, during this lesson on finishing, we learned about: the best paper towels to use, how stains can be mixed to achieve the color you want, how boiled linseed oil makes the colors of the wood pop nicely without altering the natural color and tones, the effects of the sun on colors and stains of wood, how paper towels covered in oil or varnish can spontaneously combust as they dry if they are balled up, and about a thousand other useful bits of information. Unfortunately, we don't have the time in the course to stain, oil, or varnish our tables because the drying process takes so long (up to two weeks depending on the finishes you decide to use) but, the teachers at the school give this final lesson so that we knew exactly how to tackle the final stages of your table completion at home.

I have big plans for a coat of boiled linseed oil and a few of varnish to finish up my table. This photo gives you an idea of where my table stands at the moment. For the most part, everyone in the class left with their tables in the same state. I have the assembly done and because the blocks that hold the table top in place are so easy to remove and put back on, I will take it apart to tackle the linseed oil and varnish stages. The table is sanded and ready to take it's coat of boiled linseed oil at the first chance I get. We know it's square because we measured for squareness while it was clamped so we could make any adjustments necessary while the glue was still malleable. I will be sure to post pictures of it's progress through the finishing process. I hope my classmates send us photos of their completed tables at home so I can share some success stories with readers! I can already envision what a perfect home mine will make for my record player in the living room of my small Philly apartment. It will be a slight contrast to the cheap, black, particle board furniture that fills the rest of the room.

I want to take the time to thank the wonderful teachers at the Lohr School of Woodworking for spending six days trying to give all the information you have about the beginning stages of woodworking to us. I also want to thank my classmates for being such great people and providing such a positive and communal learning environment. I hope to see some of them come back for the advanced classes so we can continue building woodworking knowledge from Jeff, Rob, Eoin, and Suzanne. Beginning a new craft is challenging but the outcome is so stunning and fills you with so much pride, I can honestly say I would recommend the course to anyone with any interest in woodworking. Tomorrow, I step out of my student suit and back into my apprentice suit but I look forward to all the Practical Woodworking courses to come with this new year! And, a final congrats to my fellow December 2012 Practical Woodworking graduates (and the chickens, too)!

Saturday, December 8, 2012

Practical Woodworking Day 5

Yesterday was our fifth day of the practical woodworking course. That makes today our last day and how bittersweet it is. After what will be six days of long, hard-working hours I know we will all be happy to return to our respective parts of the country to sleep and reflect on the immense amount of information we were handed this week. But, I'm sure we can all agree that we'll smile when we look at our stunning tables and remember that beyond the exhaustion and splinters, we had a great time learning a craft together from the best is in the business!

Anyway, on to reflect about day five. The day began with coffee and pastries, as per usual. We had four skirt boards and four legs that were begging for some artistic flair. No need to worry, the shop was prepared to deliver. Here, Jeff is showing us a table router that has a bit in it that makes a small bead along the edge of the board you push through it. I ended up using this detail on my skirt boards for a little rounded detail to match the edge of my table top. This process was surprisingly simple as long as you make sure there is no saw dust piled up preventing you from making a straight cut. Naturally, I did not make sure of that but, we'll chalk it up to a learning experience. Another option we were taught for our skirt boards was cutting it to a curve. You can see Steve proudly showing off his curve. To achieve this detail, we were taught to used a nail, a thin piece of wood, and some clamps to trace a perfect curve. Then, head over to the jig saw and cut along the line. Fairly simple until you need to take a block planer to it to make sure it's is smooth and symmetrical. But, it really does end up looking great.


The next detail we learned about dealt with the legs. We were taught about the development of another Jeffry Lohr original jig designed to taper legs so they have two angled sides instead of being square. I am using said jig in the picture to the left. The jig holds the leg firmly in place with wedges at the angle desired. The excess wood hangs over the edge. It even had a handy handle to push the jig and the leg through the table saw. I must say, this jig produces some fine looking table legs.

As I mentioned yesterday, I had to finish up my tenons before I could do much of anything else. Now that I had learned of all the fun details I could add to my table, I was hustling to get the tedious work out of the way. I finally got all eight tenons to fit into their mortise holes. I also learned to properly spell the word 'tenons' in the process. Larissa's woodworking vocab score +1.
The tenons were fitted, the details were added and it was time for me to dry assembly my table to make sure everything fit and looked the way I wanted. Good news, ladies and gentlemen, my table stands! It's hard to see the tapered legs and the beaded detail along the skirt board in the photo but I assure you that they are there. I played it simple this time around knowing that I will have ample opportunity to design and assemble many more tables during the apprenticeship. I want to be able to look at this table twenty years from now as my first woodworking project and not think to myself, "what was I thinking?" Although I probably will anyway, being logical and math-minded, I played it safe. Some of my classmates have the most detailed, creative, and beautiful tables! I will be sure to snag some photos of their creations as well so you can see how we all started with the same basic design but ended with radically different looking final products. Another reason this class is so wonderful!
After lunch Jeff gave us a demonstration on how to fill knots so they look nice and natural. Using bits of crushed bark and/or wood pieces he combined them with other colored powders and epoxy until it formed a paste. Once the paste matched the color he wanted, he taped the space around the knot(s) and filled it with the paste. He made sure the paste filled the entire hole and then some so that it was raised above the wood surface. He told us that when it dries, he can sand it down and it will look like a natural knot.

For the most part, the rest of the afternoon was devoted to sanding. Jeff gave us a brief lesson on sandpaper grit numbers and what they meant. He also talked to us about which sanding machines were best. He is a fan of the random orbit sanders because they don't leave the circular marks on the wood that other sanders do. We took to our table legs, skirts, and tops to sand each of them with 80, 120, 180, and finally 220 grit paper. By the end of the day, my wood was like satin. Granted, my hand was numb from the hours of vibration but, I couldn't believe it! We made sure to avoid rounding the edges of the boards that would be glued so that they would remain flush with the parts they would be glued to. Today, my job (amongst gluing and other things, I am sure) will be to take a sanding block and dowel rod to sand around my details. I need to re-round the beaded detail I put on my skirt boards as well as the edges of my table top. I know I will have a tired arm by the end of the day.

My workbench neighbor, Steve, has gone above and beyond on his table. His love for dark walnut has worked it's way in in the form of buttons at the tops of his legs as well as set into his table top. We all laugh at his desire to "make it fancier" but, I am impressed with his dedication to his table. I heard speak of bones being set into his table top as well. I am really, very interested in what Steve's final product will be. Here he is, hard at work, using a router to drill holes for his buttons!

Although I lack any photos to document it, Jeff spent a good portion of an hour teaching us how to replace blades in jointers and planers. He has spent time throughout the course explaining the inner workings of the machines that fill the shop. He designed this course so that if you have your own shop at home, or have the desire to begin assembling one, you know how to maintain your machines. Each process is unique and, in some cases, extremely complex but he has a method for all of it and he shares it with his students. He tells you which kind of machines he recommends but also explains the pros and cons to other options. Whether you take the course to learn the proper techniques of a craft you already experiment with or a student (like me) who knows nothing about woodworking and wants to learn, this course will give you everything you could ever need or want.

Now, I will return to our final class to (hopefully) finish up my table! I look forward to finding out what finishing touches they have in store for us today. Have a wonderful Saturday!

Friday, December 7, 2012

Practical Woodworking Day 4

By day 4 of class, I have learned so much it seems as if we have been submerged into a world of wood and I finally (sort of) know my way around it. It's nice to have classmates around learning and experiencing the same confusion, anxieties, increasing comforts and immense excitement with me.

When Jeff says, "Today, you need to cross cut your skirt boards to their correct lengths and joint the edges to make sure they are right angles", I know exactly what he is telling me to do. To the right, you can see how the day began for me. Just as Jeff instructed, I used the table saw to cross cut my skirt boards. These boards will fit into my legs using the mortises I cut into them two days ago. It was important to make sure that the pairs of skirt boards matched perfectly in thickness, width, and length so that the table would be a proper rectangle.

In order for them to fit into the mortises, however, we needed to cut tenons into the skirt boards. Celesta is doing just that in the picture to the right. Using the table saw again, we cut the male part of our puzzle pieces (formally and properly known as tenons) out of the edges of our skirt boards. This process was tedious only in the fact that we had to make sure that all the boards were cut the exact same way so they could fit into the exact same-sized mortise holes we drilled the day before.


Eoin demonstrated how the tenon should fit snug into the mortise. Naturally, it isn't always so simple. Some tenons will be too thick, some too thin, and some too long to fit just right into their mortises. We were taught several methods for solving such problems. Using chisels we can shorten the length of the tenon if it is too long or if the cut along the shoulder is raised preventing the skirt board from fitting snug against the leg. We learned to use hand planers to lessen the thickness of the tenons but were advised to be weary of how much wood they take off because a tenon can go from too thick to too thin in a hurry. When we need to take off just a bit of thickness, we were taught to use the cabinet scrapers we had conveniently learned to sharpen the day before. It is a delicate process making a tenon fit properly into it's mortise, I must say. We made sure to fit each tenon to the mortise it will be glued into when we finally glue the table together.


In order to know which tenon paired with which mortise, we needed to decide how we wanted out table skirts to be arranged. Here we are as a class (because the teachers are building a class table as we are building our individual ones to model how things should and/or could go as the process progresses) deciding which faces of our skirt boards we want to show from the front, sides, and back of the table. We talked about how grain is most appealing to the eye; tighter grain toward the bottom. We discussed how any flaws might want to be hidden towards the inside of the table so they aren't obviously visible when it's in our homes. Once we had decided on the arrangement of our faces (which I was doing in the photo), we labeled our tenons accordingly. Each tenon was marked with the leg number it would fit into and an arrow indicating which side was going to be up. Now, we could start fitting our tenons into their matching mortises. As I said, a delicate process. I am still not finished with fitting mine. I will be finishing that up today!


Now it was on to adding some flair to our table tops. We planed and jointed them to perfect rectangles the previous day so they were ready to look like table tops. After a lesson in varying router bits, we were sent on our own to decide what kind of shape we wanted the edge of our tops to have. By the time this picture was captured, I had already done my end grain cuts but, during Rob's lesson we were told to start with the end grain so that when we cut the length, any little fibers that were left from the end grain cut would be removed. We also took a smaller router to the sharp table edge that was left to round it a bit. Because I know we will be sanding the edges sooner or later, I decided on a relatively simple edge so I wouldn't have to work the sandpaper into difficult crevasses. I must say though, some of my classmates were more inventive with their edges and they look so great!
Celesta and Duane were the first to have their tables together! See how great they look! There is still finishing and optional skirt detail to toy with but, the overall product looks so wonderful. Like I said, my tenons still need some work before I can see what mine will look assembled but, Celesta and Duane gave me a little preview and a boost of motivation to get those tenons fitted quickly. We only have today and tomorrow left of class so I am anxious to learn how to finish these masterpieces up. Until tomorrow, readers, I bid you a happy Friday!

Thursday, December 6, 2012

Practical Woodworking Day 3

As a class, we have all survived day three of Practical Woodworking. I look at what used to be three rough boards and am happy to say it's starting to look like real parts of a table!

Yesterday we started the morning with lessons on various techniques for carving out mortises. Mortises are the rectangular holes that we are carving into our table legs to put the tendons of the table skirt into them so they hold together level and strong (a lot like a puzzle piece). We were told that using chisels is one way to dig out the wood once we have measured precisely and drawn out where the mortise will need to be. To the left, you can see Jeff teaching us how to accurately measure and draw out a mortise.

Because using a chisel is useful in more ways than hollowing out mortises, Eoin gave us a lesson in how to sharpen chisels and/or cabinet scrapers. Who knew there were so many ways to do it? But, what is comes down to is needing a fine sandpaper-ish surface. Whether it be in the form of actual sandpaper or a water or oil stone, the fine rough surface is the best and quickest way to sharpen those metal tools.


Here is a perfect example of how many ways they present information for us to understand. The left set of steps illustrates how a chisel should look as it is sharpened. The middle steps illustrate what the edge of a cabinet scraper looks like as you sharpen it. And, the drawing to the right shows us how to view and label out table legs. Each leg needs to be numbered so we can remember which way they face and which position they will take under the table.
When the lessons wrapped up right after lunch, we were put to work. I had to catch up on my table top so after a dry clamp to make sure my two boards matched up, I took to putting it together with biscuits. Suzanne was nice enough to help me with the process as I drilled holes in the center edges of my table top boards. Then I went on to use wood glue to glue the center edge and slid the biscuits into the holes I drilled for them. My table top is currently held together tightly by clamps but it should be ready for it's final joining, planing, and ripping today!


After my table top was glued, I moved on to nearly finish up my legs. I used a paint scraper to remove any glue that had been squeezed from the middle of the two pieces so that the glue wouldn't chip the blade of the jointer when I went to run it through. This process was fun but it was a lot harder than it looks. I think it's been made evident that I need to build some upper body strength for this job!

When the glue removal was complete, I found the flat, face side of each leg by laying it on the table to find which side didn't wobble. I ran that side through the jointer and then rotated the leg once and did it again so I had to perfectly perpendicular sides. From there, it was necessary to make sure the other two sides were parallel to the ones I had just made. To do this, we needed to make sure to mark the jointed sides with x's so that we wouldn't lose them. Now, it was on to the planer.

Teamwork on the planer! We ran two legs at a time through the planer to make the non-x sides parallel to the x sides. Once that was completed, we needed to make them square. By setting the planer to our desired thickness, we ran the legs through making sure to plane each non-x side as a pair so that the same amount was being cut off each time keeping it square and right-angled. The method they use to make sure to keep things straight is writing an odd and even number on each side as they come through so we know which sides have been planed and which haven't.


Now that my legs were square, it was time to put in some mortises. As I mentioned before, Jeff explained at least four different ways to cut out mortises but the easiest, quickest, and most accurate method was using a router. Not only a router though! Jeff, faced with the struggle of carving out these mortises so many times but it taking far too much time and effort, has created a jig. This jig stops the router at the start and end of the exact length of our desired mortise. Beyond that, it holds it straight against the leg face so that the mortise is straight and accurate.

Here I am hard at work using Jeff's jig and the router to cut out my mortises. Each leg has two mortises cut out of it. Like I said, the jig makes it almost effortless. I carved out my eight mortises in a matter of two minutes. Much easier than measuring, marking, and chiseling! I am very much looking forward to learning more about the creation and assembly of jigs.
Nearing the end of class, Jeff and Rob showed us how to joint and plane our table tops. Naturally, because we are dealing with a natural material, there are bound to be flaws and difficulties. Noah, found himself with a could of knots on the top of his table. The problem with this is when he put it through the planer, the grain was torn out around the knots because it wasn't going the same way as the rest of the board. Jeff took this as a learning opportunity and called us all around to tackle the issue. He lightly wet the grain around the knot and ran the board in the direction that the largest grain issue was running. This fixed a large portion of the tear out. Then, he showed us how there was only a small amount of roughness left so that would be taken care of with a sander. Now that the majority of the board was smooth, it was easier to take care of the small area of difficulty.

Another day, another step closer to our tables. Today, we will deal with our table skirts and, if you are me (and behind), you will joint, plane, and rip your table top! Until tomorrow, I bid my readers a great Thursday!